벨로그가 보기 편합니다.
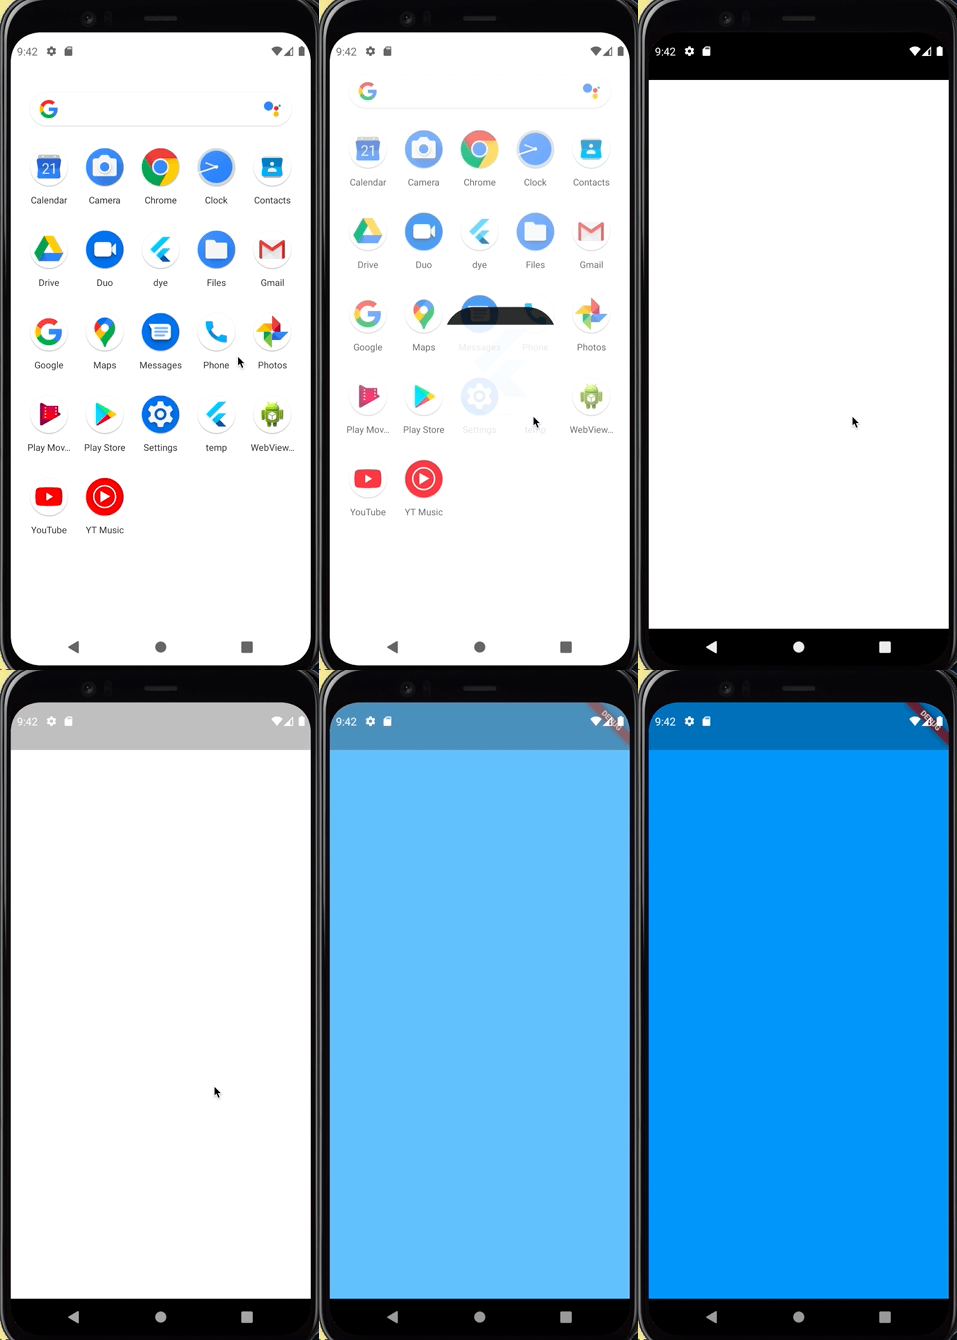
 누구나 한번쯤 경험해봤던 '그 버벅거림'
<위 영상은 Debug모드로 빌드되었습니다.>
void main() async {
runApp(MyApp());
}
class MyApp extends StatefulWidget {
const MyApp({Key? key}) : super(key: key);
_MyAppState createState() => _MyAppState();
}
class _MyAppState extends State<MyApp> {
Widget build(BuildContext context) {
return MaterialApp(
home: Scaffold(
body: Container(
color: Colors.blue,
),
),
);
}
}
Dart
복사
릴리즈모드로 빌드할땐 덜 하지만,
앱을 실행시킬 때 초반에 나오는 '그 버벅거림'이 있다.
main함수에서 Duration만으로 스플래시 화면을 적용하려하니
화면 전 흰 화면이 잠시 나오고, 이를 해결할 방법을 찾아야 했다.
<버전체크>
왜 버벅거리지?
이유는 플러터의 작동방식에 있다.
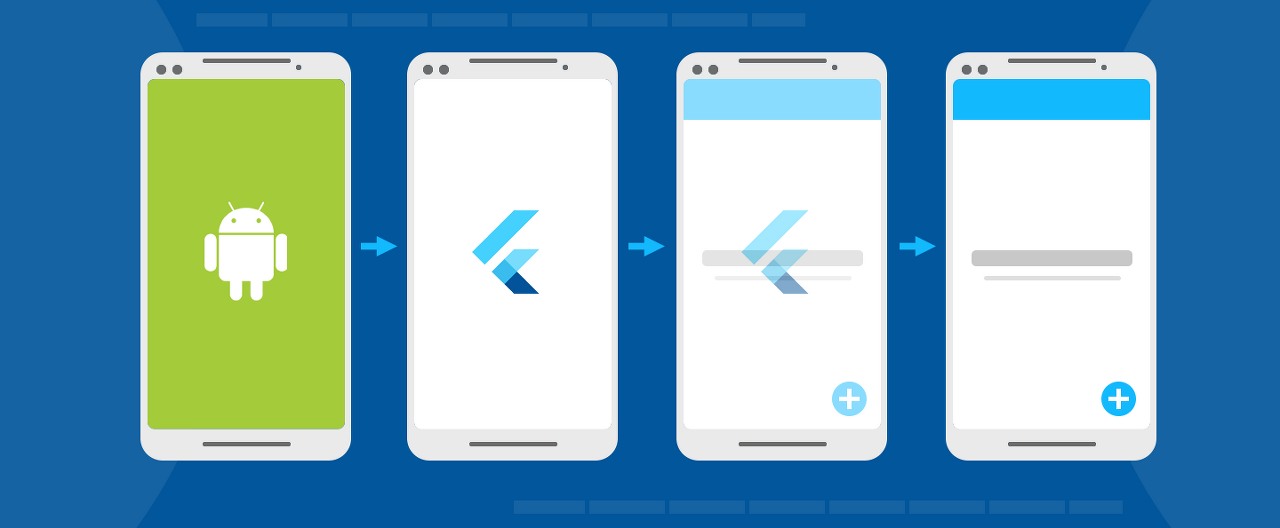
플러터는 앱이 실행될 때, 기본 앱 (네이티브 앱)이 플러터를 로드하는 동안 잠깐의 짧은 대기시간이 존재한다.
이 시간동안 기본 앱의 흰색 화면이 스크린에 표시되며, 마치 버벅거리는 것처럼 보인다.
(flutter의 자세한 내부구조와 렌더링 원리는 아래 블로그를 통해 확인할 수 있다.)
버벅거리는 것 같은 화면을 방지하려면,
네이티브 어플 단에서 플러터가 화면에 rendering하기 전까지
splash화면을 보여주면 된다.
 flutter_native_splash
이 패키지는, 네이티브 단의 기본 시작화면의 배경색, 시작이미지(png), 브랜딩(회사) 등을 설정하고 정렬할 수 있는 패키지이다. iOS, Android 및 웹의 네이티브 코드들을 자동으로 생성하고, 다크모드, 전체화면과 플랫폼별 옵션 등을 지원한다.
이 패키지를 사용하면 네이티브 단(Android, iOS, Web)에서의 splash 화면을 설정에 맞게 만들어주고, Flutter가 첫 화면의 프레임을 렌더링하기 전까지 해당 화면이 노출된다.
 사용법
사용법
1.
flutter_native_splash패키지를 다운받는다.
dependencies:
flutter_native_splash: ^2.0.5
Dart
복사
2.
pubspec.yaml에 아래 내용을 넣거나, 루트 프로젝트 폴더에 flutter_native_splash.yaml이름의 새 파일을 생성 후 아래 코드를 삽입한다.
해당 코드는 패키지 사이트 여기에서 확인할 수 있다.
주석이 굉장히 친절하게 설명하고 있기 때문에, 따로 해당파일을 파헤쳐보진 않으려 한다.
flutter_native_splash:
# This package generates native code to customize Flutter's default white native splash screen
# with background color and splash image.
# Customize the parameters below, and run the following command in the terminal:
# flutter pub run flutter_native_splash:create
# To restore Flutter's default white splash screen, run the following command in the terminal:
# flutter pub run flutter_native_splash:remove
# color or background_image is the only required parameter. Use color to set the background
# of your splash screen to a solid color. Use background_image to set the background of your
# splash screen to a png image. This is useful for gradients. The image will be stretch to the
# size of the app. Only one parameter can be used, color and background_image cannot both be set.
color: "#42a5f5"
#background_image: "assets/background.png"
# Optional parameters are listed below. To enable a parameter, uncomment the line by removing
# the leading # character.
# The image parameter allows you to specify an image used in the splash screen. It must be a
# png file and should be sized for 4x pixel density.
#image: assets/splash.png
# This property allows you to specify an image used as branding in the splash screen. It must be
# a png file. Currently, it is only supported for Android and iOS.
#branding: assets/dart.png
# Specify your branding image for dark mode.
#branding_dark: assets/dart_dark.png
# To position the branding image at the bottom of the screen you can use bottom, bottomRight,
# and bottomLeft. The default values is bottom if not specified or specified something else.
#
# Make sure this content mode value should not be similar to android_gravity value and
# ios_content_mode value.
#branding_mode: bottom
# The color_dark, background_image_dark, and image_dark are parameters that set the background
# and image when the device is in dark mode. If they are not specified, the app will use the
# parameters from above. If the image_dark parameter is specified, color_dark or
# background_image_dark must be specified. color_dark and background_image_dark cannot both be
# set.
#color_dark: "#042a49"
#background_image_dark: "assets/dark-background.png"
#image_dark: assets/splash-invert.png
# The android, ios and web parameters can be used to disable generating a splash screen on a given
# platform.
#android: false
#ios: false
#web: false
# The position of the splash image can be set with android_gravity, ios_content_mode, and
# web_image_mode parameters. All default to center.
#
# android_gravity can be one of the following Android Gravity (see
# <https://developer.android.com/reference/android/view/Gravity>): bottom, center,
# center_horizontal, center_vertical, clip_horizontal, clip_vertical, end, fill, fill_horizontal,
# fill_vertical, left, right, start, or top.
#android_gravity: center
#
# ios_content_mode can be one of the following iOS UIView.ContentMode (see
# <https://developer.apple.com/documentation/uikit/uiview/contentmode>): scaleToFill,
# scaleAspectFit, scaleAspectFill, center, top, bottom, left, right, topLeft, topRight,
# bottomLeft, or bottomRight.
#ios_content_mode: center
#
# web_image_mode can be one of the following modes: center, contain, stretch, and cover.
#web_image_mode: center
# To hide the notification bar, use the fullscreen parameter. Has no effect in web since web
# has no notification bar. Defaults to false.
# NOTE: Unlike Android, iOS will not automatically show the notification bar when the app loads.
# To show the notification bar, add the following code to your Flutter app:
# WidgetsFlutterBinding.ensureInitialized();
# SystemChrome.setEnabledSystemUIOverlays([SystemUiOverlay.bottom, SystemUiOverlay.top]);
#fullscreen: true
# If you have changed the name(s) of your info.plist file(s), you can specify the filename(s)
# with the info_plist_files parameter. Remove only the # characters in the three lines below,
# do not remove any spaces:
#info_plist_files:
# - 'ios/Runner/Info-Debug.plist'
# - 'ios/Runner/Info-Release.plist'
YAML
복사
생각보다 코드의 양도 많고 splash 정보만 따로 설정하기 용이하기 때문에, 새 파일을 만드는 것을 추천한다.
3.
패키지를 실행하기 위해 터미널에서 아래와 같이 명령어를 실행한다.
flutter pub run flutter_native_splash:create
YAML 파일 위치를 지정하려면 터미널에서 명령과 함께 --path를 추가한다.
flutter pub run flutter_native_splash:create --path=path/to/my/file.yaml
4.
(옵션) 만약 스플래시 화면동안 유저 정보 등 시간이 걸리는 작업이 필요할 경우, 직접 스플래시 화면 전환을 제어할 수 있다.
import 'package:flutter_native_splash/flutter_native_splash.dart';
void main() {
WidgetsBinding widgetsBinding = WidgetsFlutterBinding.ensureInitialized();
FlutterNativeSplash.preserve(widgetsBinding: widgetsBinding);
runApp(const MyApp());
}
// whenever your initialization is completed, remove the splash screen:
FlutterNativeSplash.remove();
Dart
복사
•
preserve, remove
FlutterNativeSplash.preserve(widgetsBinding: widgetsBinding);를 사용하면, Flutter에서 첫 프레임을 렌더링하였더라도 네이티브단의 스플래시화면을 없애지 않는다.
유저정보나 로그인 정보 등 앱 시작 시 필요한 정보나 permission을 받아야 할 때, 원하는 행위가 다 끝난 후 FlutterNativeSplash.remove();를 사용하여 스플래시 화면을 없앨 수 있다.
 유의사항
유의사항
패키지를 통한 스플래시 화면 수정 / 삭제 시
이 패키지는 flutter에서 특별히 사용되는 함수들이 아니라, 터미널을 통해 패키지를 사용하여 네이티브 패키지(프로젝트) 내에 코드를 직접 삽입하는 패키지이다.
스플래시 화면을 삭제하려면
flutter pub run flutter_native_splash:remove
을 사용하여 네이티브에 적용된 파일과 코드들을 없앨 수 있으며,
삭제 후 yaml파일 수정 후, 다시 create하여 새로 생성하는 것으로 스플래시화면을 수정할 수 있다.
화면전환조건
preserve, remove함수를 사용하여 스플래시 화면을 없앴는데 flutter가 첫번째 프레임을 렌더링하지 못하였을 경우는, flutter가 렌더링 하기 전까지 스플래시 화면을 유지해준다.
즉,
flutter 첫번째 프레임 렌더링
&& ( preserve함수사용? (remove함수호출? true : false) : true)
== true
가 만족되어야 스플래시 화면이 사라진다.
removeAt
removeAt함수도 있으나, 잘 작동하지 않는 것 같아 따로 설명을 하지 않았다.
fullscreen
해당 내용은 flutter_native_splash.yaml에 더 자세히 나와있다.
# To hide the notification bar, use the fullscreen parameter. Has no effect in web since web
# has no notification bar. Defaults to false.
# NOTE: Unlike Android, iOS will not automatically show the notification bar when the app loads.
# To show the notification bar, add the following code to your Flutter app:
# WidgetsFlutterBinding.ensureInitialized();
# SystemChrome.setEnabledSystemUIOverlays([SystemUiOverlay.bottom, SystemUiOverlay.top]);
#fullscreen: true
Plain Text
복사
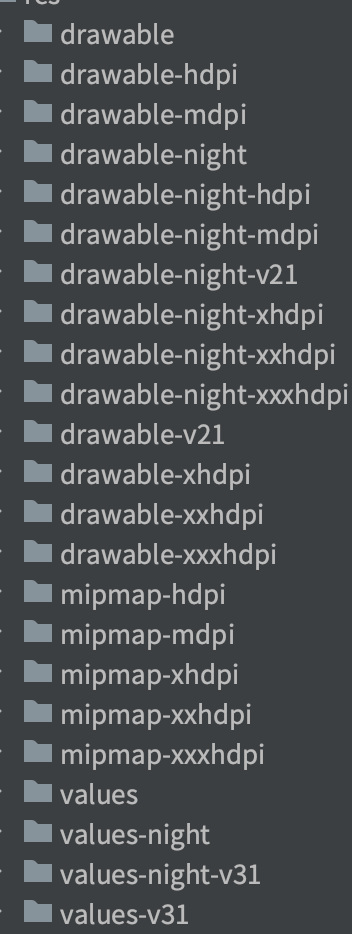
Android에서 splash내 image를 적용했지만, 빈 화면으로 스플래시가 나오는 에러
android에서 image가 제대로 나오지 않는 현상이 있을 수 있다.
혹은 에뮬레이터에서는 잘 작동하지만 휴대폰에서는 잘 작동하지 않을 수 있다.
이는 안드로이드 내 drawable 폴더에 관한 이슈로, night모드, API21이상 모드 등 몇가지 폴더에 우리가 넣은
image: ###.png
Plain Text
복사
파일이 들어있지 않아 발생한다.
이는 res내 필요없는 drawable폴더를 삭제하거나, flutter_native_splash.yaml내 dark모드를 일반 모드에서와 같이 설정해주면 해결된다.
 참고하면 좋을만한 글
•
https://velog.io/@broccolism/Flutter-이-코드..-%ED%99%94%EB%A9%B4%EC%97%90-%EC%96%B4%EB%96%BB%EA%B2%8C-%EB%A0%A4%EC%A7%88%EA%B9%8C-1.-%ED%8A%B8%EB%A6%AC

