

Background: TCP and UDP
TCP(Transmission Control Protocol) and UDP(UserDatagram Protocol)
TCP : reliable data transfer(신뢰할만한 데이터 전송)
UDP : fast communication than rekliability, multicast and broadcast(신뢰보다는 속도 중심의 전송)
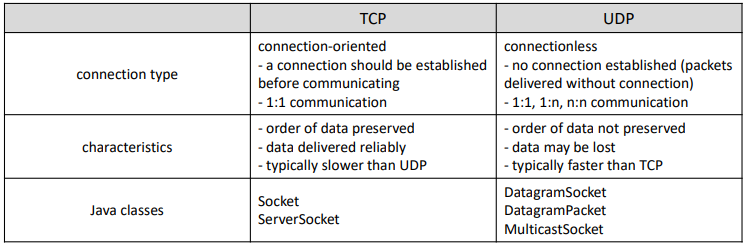
TCP는 연결이 필요하고 UDP는 연결없이 일단 데이터 전송을 한다.
TCP는 1:1 통신이고 UDP는 1:다 통신이다.
TCP는 데이터가 보내진 순서대로 받는다. UDP는 보내진 순서와 관계없이 받을 수 있다.
TCP는 신뢰있게 데이터가 보내진다. UDP는 데이터가 중간에 날아갈 수 있다.
TCP는 속도가 UDP보다 느리다. UDP는 TCP보다 속도가 빠르다.
자바 클래스에서 Socket을 사용하면 TCP. 자바 클래스에서 Datagram, Multicast 가 나오면 UDP.
TCP Socket Programming
Socket에는 IP address와 Port 번호가 존재한다. 그래서 client와 server은 TCP socket을 이용해서 통신을 하게 된다.
1.
서버가 ServerSocket을 만들어서 특정 Port에서 기다린다. 그리고 클라이언트가 접속 요청이 될때까지 기다린다.
2.
클라이언트는 서버의 IP 주소와 port number을 가지고 socket을 만든다. 서버와 연결요청을 보낸다.
3.
Server 소켓이 client 요청을 받아들이고 client을 위한 Socket(!= Server Socket)을 만들어 놓고 client Socket과 연결한다.
4.
최종적으로 서버와 서버의 소켓간의 데이터 통신이 이루어 진다.
TCP Socket Programming: Socket and ServerSocket
•
class Socket
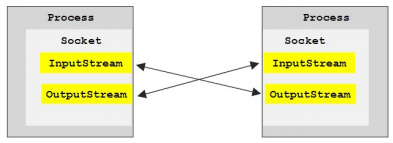
이제 Client와 Server간에 Socket으로 통신을 하게 되고 통신은 InputStream과 OutputStream을 이용해서 상호 데이터를 주고 받게 된다.
•
class ServerSocket
특정 포트를 bind한다음 클라이언트의 연결요청을 기다린다. 그리고 클라이언트로부터 요청이 들어오면 새로운 소켓을 만들어 클라이언트 소켓과 데이터 통신을 하게 된다.
TCP Socket Programming: Server
먼저 서버 소켓을 만들고 port와 연동(bind)해 놓는다.
이때 port number은 서버가 열어놓을 포트 번호이다. 만약에 해당 포트 번호에 다른 애플리케이션이 사용하고 있다면 우리는 이 포트를 사용할 수 없다.
서버는 한번 켜놓으면 프로그램을 계속 돌리는 것이다. 그래서 중간에 infinite while loop를 사용하였다.
public class Lecture {
// 자바 SimpleDateFormat을 이용해서 현재시간을 출력하도록 만드는 static method이다.
static String getTime() {
SimpleDateFormat f = new SimpleDateFormat("[hh:mm:ss]");
return f.format(new Date());
}
public static void main(String args[]) {
ServerSocket serverSocket = null;
try {
// 클래스 객체로 포트번호 7777번을 열어놓는다.
serverSocket = new ServerSocket(7777);
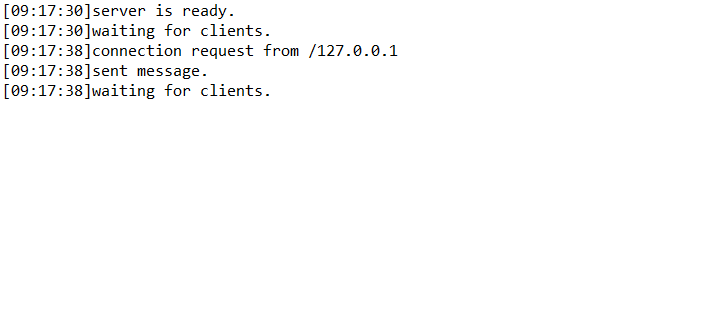
System.out.println(getTime() + "server is ready.");
} catch(IOException e) { e.printStackTrace(); }
// 서버는 한번 켜놓으면 프로그램을 계속 돌리는 것이다.
while(true) {
try {
System.out.println(getTime() + "waiting for clients.");
// accept를 호출하고 클라이언트가 접속할때까지 이 부분에서 코드가 멈춘다.
Socket socket = serverSocket.accept();
System.out.println(getTime() + "connection request from " + socket.getInetAddress());
//소켓에 있는 OutputStream에서 가져왔다.
OutputStream out = socket.getOutputStream();
//DataOutputStream을 만들어 데이터를 받아오게 한다.
DataOutputStream dos = new DataOutputStream(out);
//OutputStream으로 String을 쏘는 것이다.
dos.writeUTF("[Notice] Test Message1 from Server.");
System.out.println(getTime() + "sent message.");
// 최종적으로 모든 과정이 끝난것을 닫아준다.
dos.close();
socket.close();
} catch (IOException e) { e.printStackTrace(); }
}
}
}
Plain Text
복사
TCP Socket Programming: Client
Client는 서버의 주소와 포트번호를 알아야 접속이 가능해 진다.
public class Lecture {
public static void main(String[] args) {
try {
String serverIp = "127.0.0.1"; // local address
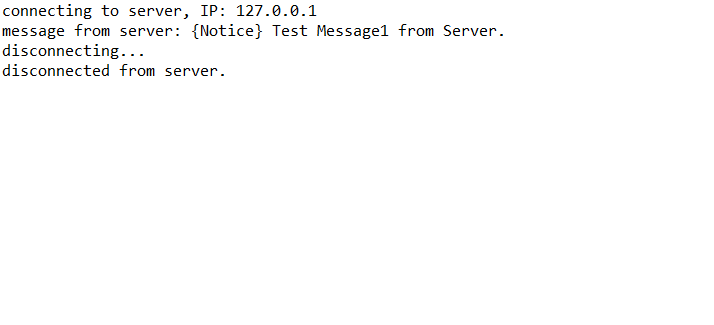
System.out.println("connecting to server, IP: " + serverIp);
// IP address와 Port번호를 가지고 Socket을 만든다. 그러면 Socket에 IP와 Port가 들어가 있게 된다.
Socket socket = new Socket(serverIp, 7777);
//위에서 커넥션이 된 상태로 InputStream을 만든다.
InputStream in = socket.getInputStream();
DataInputStream dis = new DataInputStream(in);
//UTF char set format으로 데이터를 읽어드린다.
System.out.println("message from server: " + dis.readUTF());
System.out.println("disconnecting...");
dis.close();
socket.close();
System.out.println("disconnected from server.");
} catch(ConnectException ce) {
ce.printStackTrace();
} catch(IOException ie) {
ie.printStackTrace();
} catch(Exception e) {
e.printStackTrace();
}
}
}
Plain Text
복사
이번에 조금더 전문적으로 cmd로 실행시키어 보자
나는 cmder을 사용해서 내 프로그램이 있는 폴더로 이동한 다음 다음의 명령어를 입력했다.
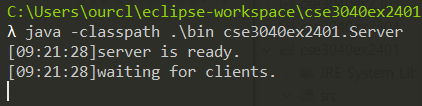
java -classpath .\bin cse3040ex2401.Server
이번에는 Client를 작동시키어 보겠다.

하면 위와 같이 서버와 접속이 되었다는 것을 확인할 수 있다.
Detour: InputStream & OutputStream
File I/O 에서 우리는 FileInputStream과 FileOutputStream을 사용한것과 같이 우리는 InputStream과 OutputStream의 abstract형태의 FileInputStream과 FileOutputStream의 superclass를 사용하게 된다.
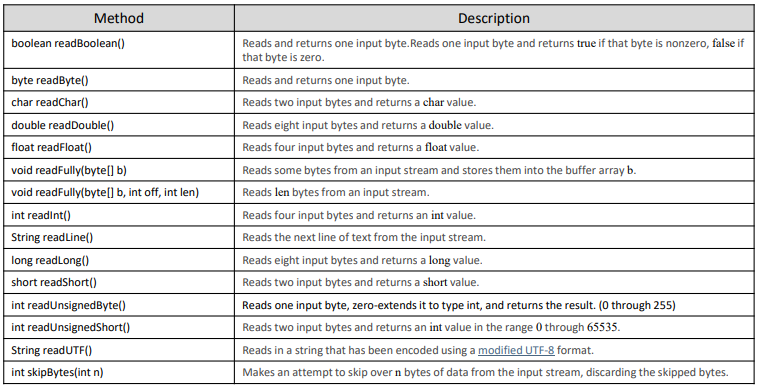
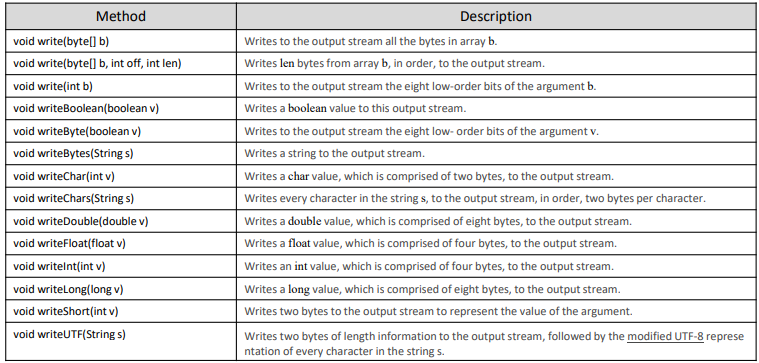
DataInputStream 함수들
DataOutputStream 함수들
DataInputStream & DataOutputStream: Example
public class Lecture {
public static void main(String[] args) {
FileOutputStream fos = null;
DataOutputStream dos = null;
try {
//파일을 제작 - dat 파일의 형태는 txt에서는 깨지지만 데이터는 가지고 있음
fos = new FileOutputStream("sample.dat");
// 데이터 작성
dos = new DataOutputStream(fos);
dos.writeInt(10);
dos.writeFloat(20.0f);
dos.writeBoolean(true);
dos.close();
} catch (IOException e) { e.printStackTrace(); }
}
}
Plain Text
복사
public class Lecture {
public static void main(String[] args) {
try {
//inputStream으로 데이터를 가져올 파일 지정
FileInputStream fis = new FileInputStream("sample.dat");
DataInputStream dis = new DataInputStream(fis);
//순차적으로 데이터를 읽어들인다.
System.out.println(dis.readInt());
System.out.println(dis.readFloat());
System.out.println(dis.readBoolean());
dis.close();
} catch(IOException e) {
e.printStackTrace();
}
}
}
Plain Text
복사
TCP Server using Threads
이렇게 스레드로 하는 것은 서버가 여러 클라이언트에게 서비스를 제공하기 위해서이다.
public class Lecture implements Runnable {
//
ServerSocket serverSocket;
Thread[] threadArr;
static String getTime() {
String name = Thread.currentThread().getName();
SimpleDateFormat f = new SimpleDateFormat("[hh:mm:ss]");
return f.format(new Date()) + " " + name + ": ";
}
// constructor
public Lecture(int num) {
try {
// 서버 소켓을 만들어 7777번 포트를 저장한다.
serverSocket = new ServerSocket(7777); // create a ServerSocket and bind to port 7777.
System.out.println(getTime() + "server is ready.");
// num의 갯수만큼 스레드 Array를 제작한다.
threadArr = new Thread[num];
} catch(IOException e) {
e.printStackTrace();
}
}
public static void main(String[] args) {
//5개짜리 스레드 Array가 제작되고 프로그램이 실행된다.
Lecture server = new Lecture(5);
server.start();
}
//스레드의 갯수만큼 스레드를 만든다음 start를 호출한다.
public void start() {
for(int i=0; i<threadArr.length; i++) {
//Runnable을 받아왔기 때문에 this를 사용한다.
threadArr[i] = new Thread(this);
threadArr[i].start();
}
}
public void run() {
while(true) {
try {
//입력이 들어오면 연결한다.
System.out.println(getTime() + "waiting for clients...");
Socket socket = serverSocket.accept();
System.out.println(getTime() + "connection request from " + socket.getInetAddress());
//OutputStream을 이용해서 데이터를 내보낸다.
OutputStream out = socket.getOutputStream();
DataOutputStream dos = new DataOutputStream(out);
dos.writeUTF("[Notice] Test Message1 from Server.");
System.out.println(getTime() + "sent message");
dos.close();
socket.close();
} catch (IOException e) {
e.printStackTrace();
}
}
}
}
Plain Text
복사
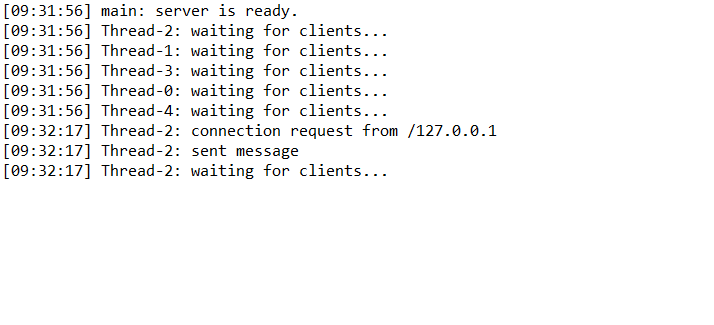
Server을 동작시키어서 Client를 호출하면 위와 같이 2번 스레드가 작동하고 멈춘다. 실재로는 5개의 스레드가 작동중이지만 말이다.
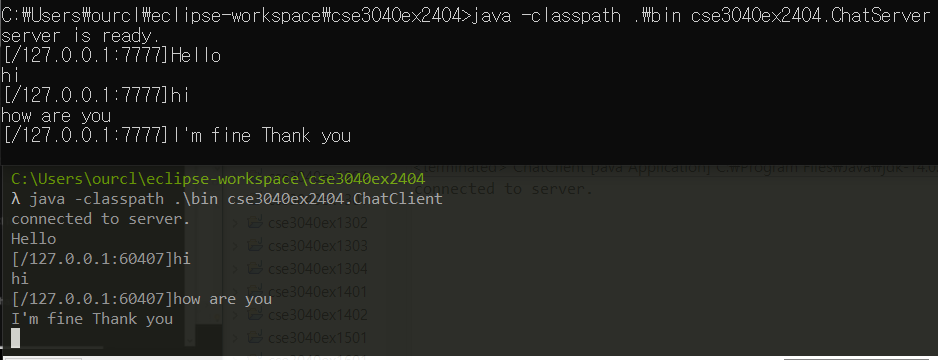
Chat Program using TCP Sockets
public class ChatServer {
public static void main(String args[]) {
ServerSocket serverSocket = null;
Socket socket = null;
try {
serverSocket = new ServerSocket(7777);
System.out.println("server is ready.");
socket = serverSocket.accept();
//Sender와 Reciver 객체를 만들어서 시작한다.
Sender sender = new Sender(socket);
Receiver receiver = new Receiver(socket);
sender.start();
receiver.start();
} catch(Exception e) {
e.printStackTrace();
}
}
}
class Sender extends Thread {
//소켓, DataOutputStream, name이 존재
Socket socket;
DataOutputStream out;
String name;
//초기화
Sender(Socket socket) {
this.socket = socket;
try {
//DataOutputStream을 제작하고 사용한다.
out = new DataOutputStream(socket.getOutputStream());
name = "["+socket.getInetAddress()+":"+socket.getPort()+"]";
} catch(Exception e) {}
}
public void run() {
//사용자가 입력하면 그걸 output으로 보내주는 거이다.
Scanner scanner = new Scanner(System.in);
while (out != null) {
try {
out.writeUTF(name+scanner.nextLine());
} catch(IOException e) {}
}
}
}
class Receiver extends Thread {
Socket socket;
DataInputStream in;
Receiver(Socket socket) {
this.socket = socket;
try {
in = new DataInputStream(socket.getInputStream());
} catch(IOException e) {}
}
public void run() {
//network에서 메세지가 오면 계속 출력한다.
while ( in != null ) {
try {
//네트워크로부터 데이터를 읽어온다.
System.out.println(in.readUTF());
} catch(IOException e) {}
}
}
}
public class ChatClient {
public static void main(String args[]) {
try {
String serverIp = "127.0.0.1";
Socket socket = new Socket(serverIp, 7777);
System.out.println("connected to server.");
Sender sender = new Sender(socket);
Receiver receiver = new Receiver(socket);
sender.start();
receiver.start();
} catch(ConnectException ce) {
ce.printStackTrace();
} catch(IOException ie) {
ie.printStackTrace();
} catch(Exception e) {
e.printStackTrace();
}
}
}
Plain Text
복사