


Controllers
•
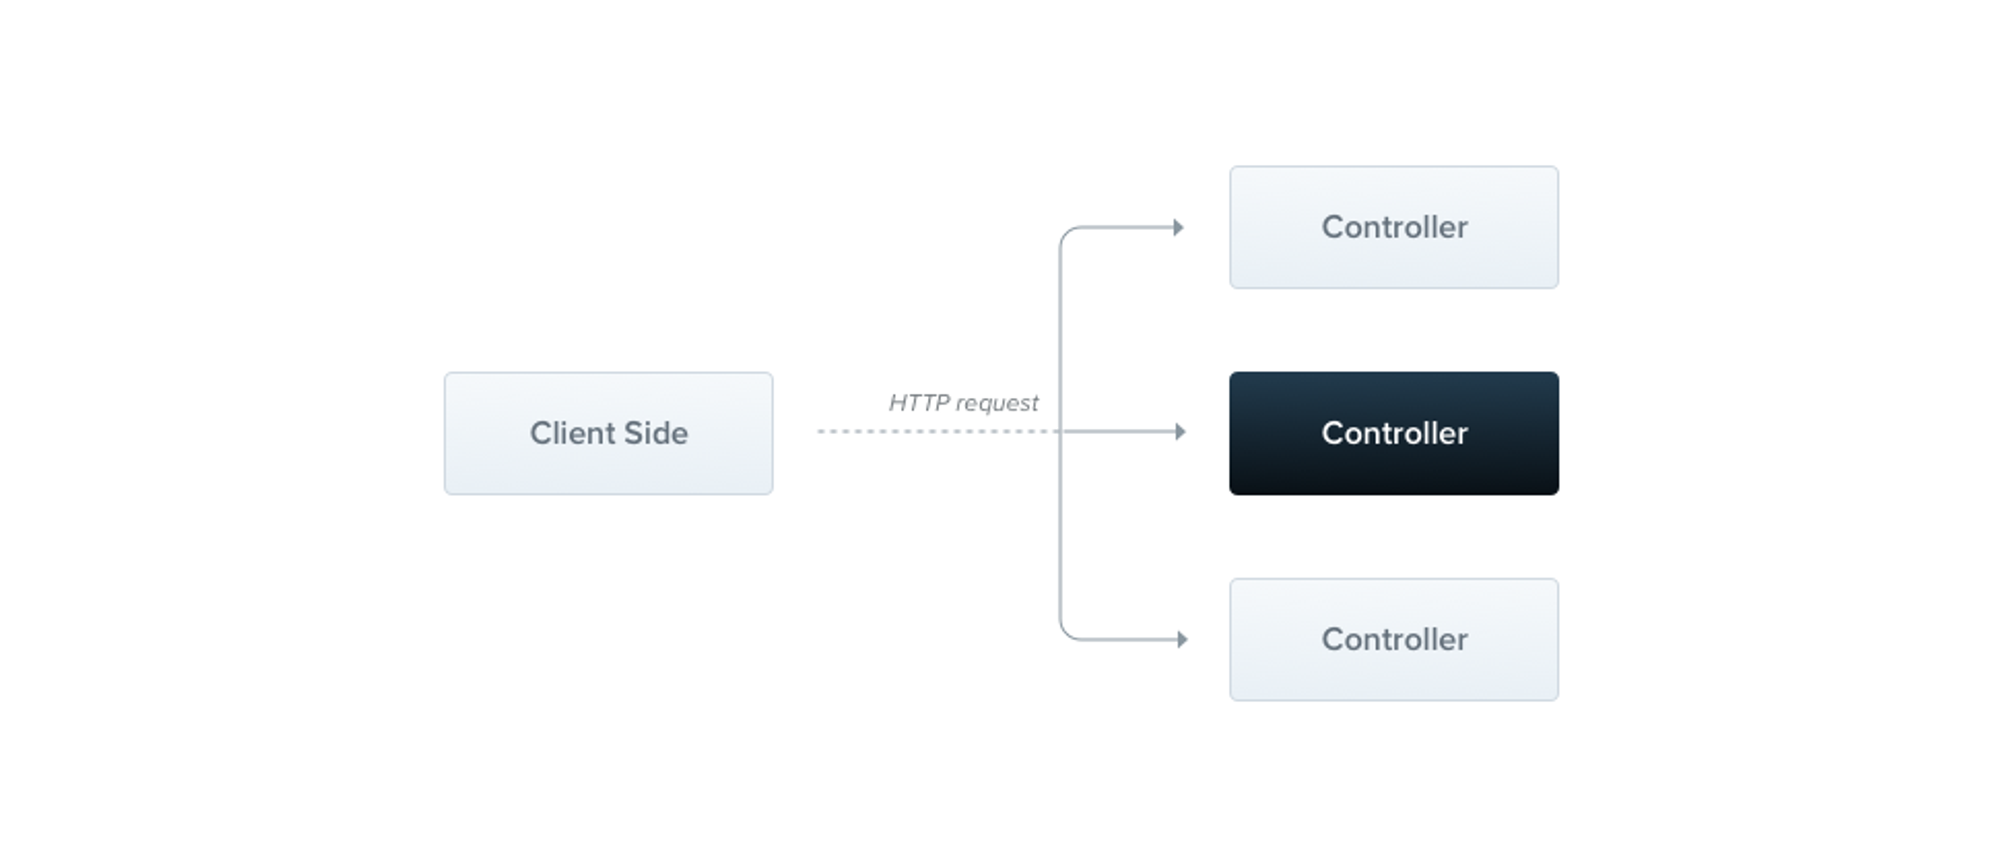
컨트롤러는 들어오는 요청을 처리하고 클라이언트에 응답을 반환하는 책임이 있다.
•
컨트롤러의 목적은 application 에 대한 특정 요청을 받는 것이다.
•
[routing] 메커니즘은은 어떤 컨트롤러가 어떤 요청을 수신하는 지 제어한다.
•
Frequently (자주), each controller has more than one route
•
and different routes can perform different actions
•
In order to create a basic controller, 우리는 [class]들과 [decorator]들을 사용합니다.
•
데코레이터는 class들을 요청된 메타데이터와 연관 짓고, 네스트가 라우팅맵을 생성할수 있도록 합니다.
•
(tie requests to the corresponding controllers) (요청을 상응하는 컨트롤러에 묶는 것)
HINT
•
For quickly creating a CRUD controller with the [validation] built-in, you may use the CLI's CRUD generator:
nest g resource [name]
Plain Text
복사
Routing
•
예제에서는 basic controller 를 정의하는데 [@Controller()] 데코레이터를 사용하였다.
•
We'll specify(지정하다) an optional route path prefix of [cats]
•
Using a path prefix in a [@Controller()] decorator allows us to easily group a set of related routes,
•
And minimize repetitve code.
•
For example, we may choose to group a set of routes that manage interactions with a customer entity under the rout /customers.
•
In that case, we could specify the path prefix [customers] in the [@Controllers()] decorator so that we don't have to repeat that portion of the path for each route in the file (@Contoller('cats') 라고 되어있다면, /cats 로 시작하는 모든 요청을 받는 다는 뜻인듯.
import { Controller, Get } from '@nestjs/common';
@Controller('cats')
export class CatsController {
@Get()
findAll(): string {
return 'This action returns all cats';
}
}
Plain Text
복사
HINT
•
To create a controller using the CLI, simply execute the [nest g controller [path prefix]] command
•
The [@Get()] HTTP request method decorator before the findAll() method tells Nest to create a handler for specific endpoint for HTTP requests. (findAll() 메소드 앞에 있는 @Get() 는 네스트에게 HTTP 요청에 대한 특별한 엔드포인트 핸들러를 만들게 한다.)
•
Endpoint : (메소드는 같은 URL들에 대해서도 다른 요청을 하게끔 구별하게 해주는 항목이 바로 Endpoint입니다.)
•
The endpoint corresponds to (~에 해당하다) the HTTP request method (GET in this case) and the route path ('endpoint' 는 HTTP 요청과 Route Path 에 해당한다.)
•
What is the route path?
•
The route path for a handler is determined(결정된다) by concatenating(사슬같이 이어진) the (optional) prefix declared(선언된) for the controller, and any path specified in the request decorator (handler 를 위한 route path 는 컨트롤러에 선언된 이어진 prefix 와, 리퀘스트 데코레이터에 지정된 path 에 의해 결정된다. 뭔ㄱ 개소리야)
•
우리가 모든 route(cats) 에 prefix 를 선언했고, 어떠한 path information 도 데코레이터에 더하지 않았기 때문에, 네스트는 GET /cats 요청을 이 핸들러에 맵핑한다.
•
말했다 시피 path 는 두 가지(optional controller path prefix, any path string declared in the request method decorator) 를 모두 포함한다.
•
예를들어, path prefix 가 customers 로 데코레이터가 @Get('profile') 이면 GET /customers/profile 요청이 맵핑된다.
•
In our example above, when a GET request is made to this endpoint, Nest routes the request to our user-defined findAll() method.
•
Node that the method name we choose here is completely arbitrary(임의의)
•
We obviously must declare a method to bind the route to (우리는 분명하게 반드시 route 에 바인드되는 메소드를 선언해야 합니다.)
•
but Nest doesn't attach any significance the method name chosen (하지만 네스트는 선택한 메소드 이름에 어떤 의미도 부여하지 않습니다.)
•
This method will return a 200 status code and the associated response(관련된 응답), which in this case is just a string.
•
Why does that happen?
•
To explain, we'll first introduce the concept that Nest employs two different options for manipulating responses : (설명하기 위해, 우리는 Nest가 응답을 조작하기 위해 두가지 다른 옵션을 사용한 다는 컨셉을 소개하겠다. - 말 진짜 개어렵게하네)
Standard (recommended)
•
Using this built-in method, when a request handler returns a JS object or array,
•
it will Autometically be serialized to JSON. When it returns a JS primitive(original language) type (e.g., string, number, boolean)
•
However, Nest will send just the value without attempting to serialize it.
•
This make response handling simple: just return the value, and Nest takes care of the rest
•
Furthermore, the response's status code is always 200 by default, except for POST requests which use 201.
•
We can easily change this behavior by adding the @HttpCode(...) decorator at a hanlder-level
Request object
•
Handlers often need access to the client request details. Nest provides access to the request object of the underlying(밑에 있는) platform (Express by default)
•
We can access the request object by instructing Nest to inject it by adding the @Req() decorator to the handler's signature
import { Controller, Get, Req } from '@nestjs/common';
import { Request } from 'express';
@Controller('cats')
export class CatsController {
@Get()
findAll(@Req() request: Request): string {
return 'This action returns all cats';
}
}
Plain Text
복사
HINT
In order to take advantage of express typings (as in the request: Request parameter example above), install @types/express package.
Request Object
•
The request object represents(나타내다, 대표하다) the HTTP request, and has properties for the request query_string, parameters, HTTP headers, and body
•
In most cases, it's not necessary to grab these properties manually
•
We can use dedicated decorators(전용 데코레이터들) instead,
•
such as @Body() or @Query(), which are available out of the box(기존 틀을 깨는 사고 or 설정(설치)없이 즉시 사용이 가능한).
•
Below is a list of the provided decorators and the plain platform-specific object they represent
•
@Request(), @Req() : req
•
@Response(), @Res() : res
•
@Next() : next
•
@Session() : req.session
•
@Param(key?: string) : req.params / req.params[key]
•
@Body(key?: string) : req.body / req.body[key]
•
@Query(key?: string) : req.query / req.query[key]
•
@Headers(name?: string) : req.headers / req.headers[name]
•
@Ip() : req.ip
•
@HostParam() : req.hosts
•
@Res() 는 단순히 @Response() 로 얼라이어스 되어있다. 이 기능을 온전히 사용하기 위해서는, 너가 사용하는 라이브러리를 import 해야 한다. (e.g., @types/express)
Resources
•
Earlier, we defined an endpoint to fetch(가져오는) the cats response (GET route).
•
We'll typically(일반적으로) also want to provide an endpoint that crates new records.
•
For this, let's create the POST handler :
import { Controller, Get, Post } from '@nestjs/common';
@Controller('cats')
export class CatsController {
@Post()
create(): string {
return 'This action adds a new cat';
}
@Get()
findAll(): string {
return 'This action returns all cats';
}
}
Plain Text
복사
•
It's that simple. Nest provides decorators for all of the standard HTTP methods : @Get(), @Post(), @Put(), @Delete(), @Patch(), @Options(), and @Head().
•
In addition, @All() defines an endpoint that handles all of them.
Route wildcards
•
Pattern based routes are supported as well. For instance, the asterisk is used as a wildcard, and will match any combination of characters.
@Get('ab*cd')
findAll() {
return 'This route uses a wildcard';
}
Plain Text
복사
•
The ab*cd route path will match abcd, ab_cd, abecd, and so on. The characters ?, +, , and () may be used in a route path.
•
And are subsets of their regular expression counterparts.
•
The hyphen () and the doy (.) are interpreted(해석된다) literally by string-based paths ( - 및 . 은 문자열 기반 경로로 문자 그대로 해석 됩니다.)
Status Code
•
As mentioned, the response status code is always 200 by default, except for POST requests which are 201.
•
We can easily change this behavior by adding the @HttpCode(...) decorator at a handler level.
@Post()
@HttpCode(204)
create() {
return 'This action adds a new cat';
}
Plain Text
복사
HINT
•
Import HttpCode from the @nestjs/common package.
•
Often, your status code isn't static.
•
But depends on various factors.
•
In that case, you can use a library-specific response (inject using @Res()) object
•
(or, in case of an error, throw an exception).
Headers
•
To specify a custom response header, you can either use a @Header() decorator or a library-specific response object (and call res.header() directly).
@Post()
@Header('Cache-Control', 'none')
create() {
return 'This action adds a new cat';
}
Plain Text
복사
HINT : Import Header from the @nestjs/common package.
Redirection
•
To redirect a response to a specific URL, you can either use a @Redirect() decorator or a library-specific response object (and call res.redirect() directly).
•
@Redirect() takes two arguments, url and statusCode, both are optional.
•
The default value of statusCode is 302 (Found) if omitted(생략된).
@Get()
@Redirect('<https://nestjs.com>', 301)
Plain Text
복사
•
Sometimes you may want to determine the HTTP status code or the redirect URL dynamically. Do this by returning an object from the route handler method with the shape :
{
"url": string,
"statusCode": number
}
Plain Text
복사
•
Returned values will override any arguments passed to the @Redirect() decorator.
•
For example :
@Get('docs')
@Redirect('<https://docs.nestjs.com>', 302)
getDocs(@Query('version') version) {
if (version && version === '5') {
return { url: '<https://docs.nestjs.com/v5/>' };
}
}
Plain Text
복사
Route parameters
•
Routes with static paths won't work when you need to accept dynamic data as part of the request (e.g., GET /cats/1 to get cat with id 1). - (요청의 일부로 동적 데이터를 수락해야 하는 경우, Route with static paths 는 동작하지 않는다.
•
In order to define routes with parameters, we can add route parameter tokens in the path of the route to capture the dynamic value at the position in the request URL.
•
The route parameter token in the @Get() decorator example below demonstrates this usage.
•
Route parameters declared in this way can be accessed using the @Param() decorator, which should be added to the method signature.
@Get(':id')
findOne(@Param() params): string {
console.log(params.id);
return `This action returns a #${params.id} cat`;
}
Plain Text
복사
•
@Param() is used to decorate a method parameter (params in the example above),
•
And makes the route parameters available as properties of that decorated method parameter inside the body of the method.
•
As seen in the code above, we can access the id parameter by referencing params.id.
•
You can also pass in a particular parameter token to the decorator, and then reference the route parameter directly by name in the method body.
HINT : import Param from @nestjs/common package.
@Get(':id')
findOne(@Param('id') id: string): string {
return `This action returns a #${id} cat`;
}
Plain Text
복사
Sub-Domain Routing
•
The @Controller decorator can take a host option to require that the HTTP host of the incoming requests matches some specific value.
@Controller({ host: 'admin.example.com' })
export class AdminController {
@Get()
index(): string {
return 'Admin page';
}
}
Plain Text
복사
•
Similar to a route path, the hosts option can use tokens to capture the dynamic value at that position in the host name.
•
The host parameter token in the @Controller() decorator example below demonstrates this usage.
•
Host parameters declared in this way can be accessed using the @HostParam() decorator, which should be added to the method signature.
Scopes
•
다른 프로그래밍 언어 백그라운드에서 온 사람들은, 거의 모든 것이 들어오는 요청에서 공유되는 네스트를 배운은 것이 예상 밖일 수 있습니다.
•
우리는 database 에 접근하는 커넥션 풀을 가지고 있고, 글로벌 상태의 싱글톤 서비스 등 이 있습니다.
•
Node.js 는 모든 요청이 분리된 쓰레드에 의해서 처리되는 request/response Multi-Threaded Stateless Model 을 따르지 않는 것을 기억하십시오.
•
따라서 우리 어플리케이션들에서 싱글톤 인스턴스르 사용 하는 것은 fully safe 합니다.
•
However, there are edge-cases when request-based lifetime of the controller may be the desired behavior (대충 아닐 때가 있다는 말인듯)
•
예를들어, per-request caching in GraphQL applications, request tracking or multi-tenanacy. 가 있다. 어떻게 컨트롤 하는지는 나중에 배워보자.
Asynchronicity
•
We love modern JS and we know that data extraction(추출) is mostly asynchronous
•
That's why Nest supports and works well with async functions
HINT : Learn more about async / await feature HERE
•
Every async function has to return a Promise.
•
This means that you can return a deferred (연기된, 지연된) value that Nest will be able to resolve by itself. - 네스트가 자체적으로 해결 할 수 있는 지연된 벨류를 리턴 할수 있다는 뜻입니다.
•
Let's see an example of this :
@Get()
async findAll(): Promise<any[]> {
return [];
}
Plain Text
복사
•
The above code is fully valid.
Request payloads
•
POST route handler 에서 클라이언트가 보낸 데이터를 DTO(Data Transfer Object) 로 받아서 사용 할 수 있는데,
•
DTO 는 interface 와 class 로 모두 사용 할수 있지만 class 로 사용 할 것을 추천한다.
•
interface 로 사용하면 이런 저런 이유 때문에 네스트가 일을 더 해야한다.
export class CreateCatDto {
name: string;
age: number;
breed: string;
}
...
@Post()
async create(@Body() createCatDto: CreateCatDto) {
return 'This action adds a new cat';
}
Plain Text
복사
Handling errors
•
다른 챕터에 존재한다 HERE
Getting up and running
•
우리가 controller 를 완벽히 만들어도, 네스트는 CatsController 가 존재하는지 모른다.
•
컨트롤러는 항상 모듈에 속해있어야 한다.(우리가 컨트롤러의 배열을 @Module() 데코레이터에 포함하는 이유이다)
•
우리는 아직 root AppModule 을 제외하고 어떤 다른 모듈도 디파인 하지 않았기 떄문에, 우리는 CatsController 를 사용하기 위해 AppModule 을 사용한다.
import { Module } from '@nestjs/common';
import { CatsController } from './cats/cats.controller';
@Module({
controllers: [CatsController],
})
export class AppModule {}
Plain Text
복사
•
우리는 @Module() 데코레이터를 사용하는 모듈 클레스에 메타데이터를 붙였다.
•
네스트는 쉽게 어떤 컨트롤러가 마운트 되었는지 반영 할 수 있다.
