

extension을 개발하면서 가장 고민했던 것 중 하나는 “이번 프로젝트에서는 또 어떤 새로운 시도를 해볼까?” 였다. 그런데 extension이 어떤 것들을 할 수 있는지 모르다보니 아이디어가 떠오르지 않았다 ㅜㅜ
그래서 새로운 아이디어를 떠올리기위해 extension에 대해 더 깊게 공부하기로 마음먹었다!
Chrome API와 Events
Extension은 구조적으로 통신을 많이 하게 된다. 내가 만든 popup과 background간의 통신, backend 서버와의 통신, 어쩌면 Chrome Brower와의 통신까지!!
•
service worker는 이벤트가 없을 때 비활성 상태가 된다. 그렇다면 이 이벤트는 어떻게 감지할까?
•
content scripts는 extension과 webpage context로부터 완전 독립적으로 존재한다. 그렇다면 webpage의 content를 background에 보낼 수 없을까?
Chrome에서는 extension을 위한 다양한 API를 제공한다. runtime과 alarm과 같은 것들이 대표적이다. 상황에 따라 적합한 API와 eventListener를 활용해 다양한 기능을 구현할 수 있다.
1) 서로다른 scripts간 통신하기
Simple one-time requests
간단하게 하나의 메세지를 주고 받으려면 runtime.sendMessage 혹은 tabs.sendMessage를 활용할 수 있다. 이 API들을 활용하면, JSON-serializable message를 contents script에서 extension으로 전달 할 수 있다. 당연히 반대로도 가능하다! 메세지를 받은 쪽에서 다시 response를 전달하는 것도 optional로 가능하다.
•
from contents script
chrome.runtime.sendMessage({greeting: "hello"}, function(response) {
console.log(response.farewell);
});
JavaScript
복사
•
from the extension to contents script
chrome.tabs.query({active: true, currentWindow: true}, function(tabs) {
chrome.tabs.sendMessage(tabs[0].id, {greeting: "hello"}, function(response) {
console.log(response.farewell);
});
});
JavaScript
복사
•
receiving end
아래 예시처럼 메세지를 받는 쪽에서는 runtime.onMessage를 사용하면 된다.
chrome.runtime.onMessage.addListener(
function(request, sender, sendResponse) {
console.log(sender.tab ?
"from a content script:" + sender.tab.url :
"from the extension");
if (request.greeting === "hello")
sendResponse({farewell: "goodbye"});
}
);
JavaScript
복사
sendResponse를 비동기적으로 하고싶다면, message channel이 추후에 보낼 응답을 위해 열려있을 수 있도록 return true를 해서 event listener에게 알려줘야 한다. 비동기로 응답을 처리하는게 아니라면 return true를 생략하고 바로 sendResponse함수를 호출하면 된다.
응답을 받는 쪽에서는 하나의 메세지에 대해서만 응답을 할 필요 없이 여러개의 응답을 처리하도록 할 수 있다. 아래처럼 request object를 활용해서 분기를 작성할 수 있다. request 뒤에오는 message는 sendMessage에서 보낸 object에 따라 달라질 수 있다!
chrome.runtime.onMessage.addListener((request, sender, sendResponse) => {
switch (request.message) {
case 'fetchUser':
sendResponse({ message: 'success' }); // can send response
break;
case 'hideButton':
// do something
break;
case 'fetchBadge':
// do some asynchronous task
return true; // must return true
}
});
JavaScript
복사
Long-lived connections
한번만 메세지를 주고받는 것이 아니라 오래 유지하고 싶다면, runtime.connect, tabs.connect를 활용할 수 있다. 아래 예제에서는 하나의 task에서 두개의 script가 여러번의 통신이 필요한 경우를 보여주고 있다. 구현하는 방법은 one-time requests와 크게 다르지 않다.
•
sending end
var port = chrome.runtime.connect({name: "knockknock"});
port.postMessage({joke: "Knock knock"});
port.onMessage.addListener(function(msg) {
if (msg.question === "Who's there?")
port.postMessage({answer: "Madame"});
else if (msg.question === "Madame who?")
port.postMessage({answer: "Madame... Bovary"});
});
JavaScript
복사
•
receiving end
chrome.runtime.onConnect.addListener(function(port) {
console.assert(port.name === "knockknock");
port.onMessage.addListener(function(msg) {
if (msg.joke === "Knock knock")
port.postMessage({question: "Who's there?"});
else if (msg.answer === "Madame")
port.postMessage({question: "Madame who?"});
else if (msg.answer === "Madame... Bovary")
port.postMessage({question: "I don't get it."});
});
});
JavaScript
복사
port lifetime에 대한 자세한 정보는 아래 문서에서 확인할 수 있다.


2) 웹 페이지 전환 이벤트 등록 with filter
특정 페이지로 navigation될 때 event를 등록하고 싶다면 chrome.webNavigation API를 활용할 수 있다. 만약 youtube.com에 접속한 시간을 측정하고 싶다면, 아래와 같은 방식을 사용하면 된다!
const filter = {
url: [
{
urlMatches: 'https://www.google.com/',
},
],
};
chrome.webNavigation.onCompleted.addListener(() => {
console.info("The user has loaded my favorite website!");
}, filter);
JavaScript
복사
3) inject html element 숨기기
webpage에 버튼을 주입하는 프로젝트를 진행하다보니, 원하는 시점에 버튼을 숨기고, 보이고를 설정할 수 있는 기능을 넣고싶었다. chrome.storage를 활용해서 모든 tab에서 동일한 상태를 가질 수 있도록 구현하였다.
service worker가 설치될 때
extension이 state를 가져야 했으므로 service worker가 설치될 때, hideButton 값을 chrome.storage에 저장하였다.
// background.js
chrome.runtime.onInstalled.addListener(() => {
chrome.storage.local.set({ hideButton: false });
});
chrome.runtime.onMessage.addListener((request, sender, sendResponse) => {
switch (request.message) {
case 'hideButton':
chrome.storage.local.get('hideButton', (data) => {
chrome.storage.local.set({ hideButton: !data.hideButton });
});
...
}
});
TypeScript
복사
chrome storage의 값이 변경될 때
popup.html에 inject element의 상태를 관리할 수 있는 button을 만들고 popup.js에 아래와 같은 코드를 작성한다. background.js로 message를 보낸다. background에서는 hideButton메세지가 오면chrome.storage 에 hideButton의 상태를 변경하게 된다.
// popup.js
hideButton.addEventListener('click', handleHideButton);
function handleHideButton() {
chrome.runtime.sendMessage({ message: 'hideButton' });
}
JavaScript
복사
content scripts에서 chrome.storage의 값이 변경됨을 감지하면 아래의 script가 동작한다. hideButton의 상태에 따라서 button의 display값을 변경하게 된다.
// contentScripts.js
chrome.storage.onChanged.addListener((changes) => {
if (changes.hideButton) {
handleHideInjectElement(root, changes.hideButton.newValue);
}
});
TypeScript
복사
어떤 기능을 만들 수 있을까?
unsolved의 초기 기획안에는 아래와 같은 기능들이 있었다.
•
내가 속한 그룹이 풀어야 할 문제 가져오기
•
내가 속한 그룹에서 나의 기여도 점수 가져오기
•
내가 속한 그룹의 기여도 랭킹 가져오기
•
그룹 변경하기
처음엔 extension에 대해 잘 모르다보니 어떤 기능을 추가할 수 있을지 감이 오지 않았다. 이제 어느정도 chrome API에 익숙해져서 다양한 아이디어들이 떠올랐다. 그럼 생각난 아이디어들을 실제로 구현해보자!!
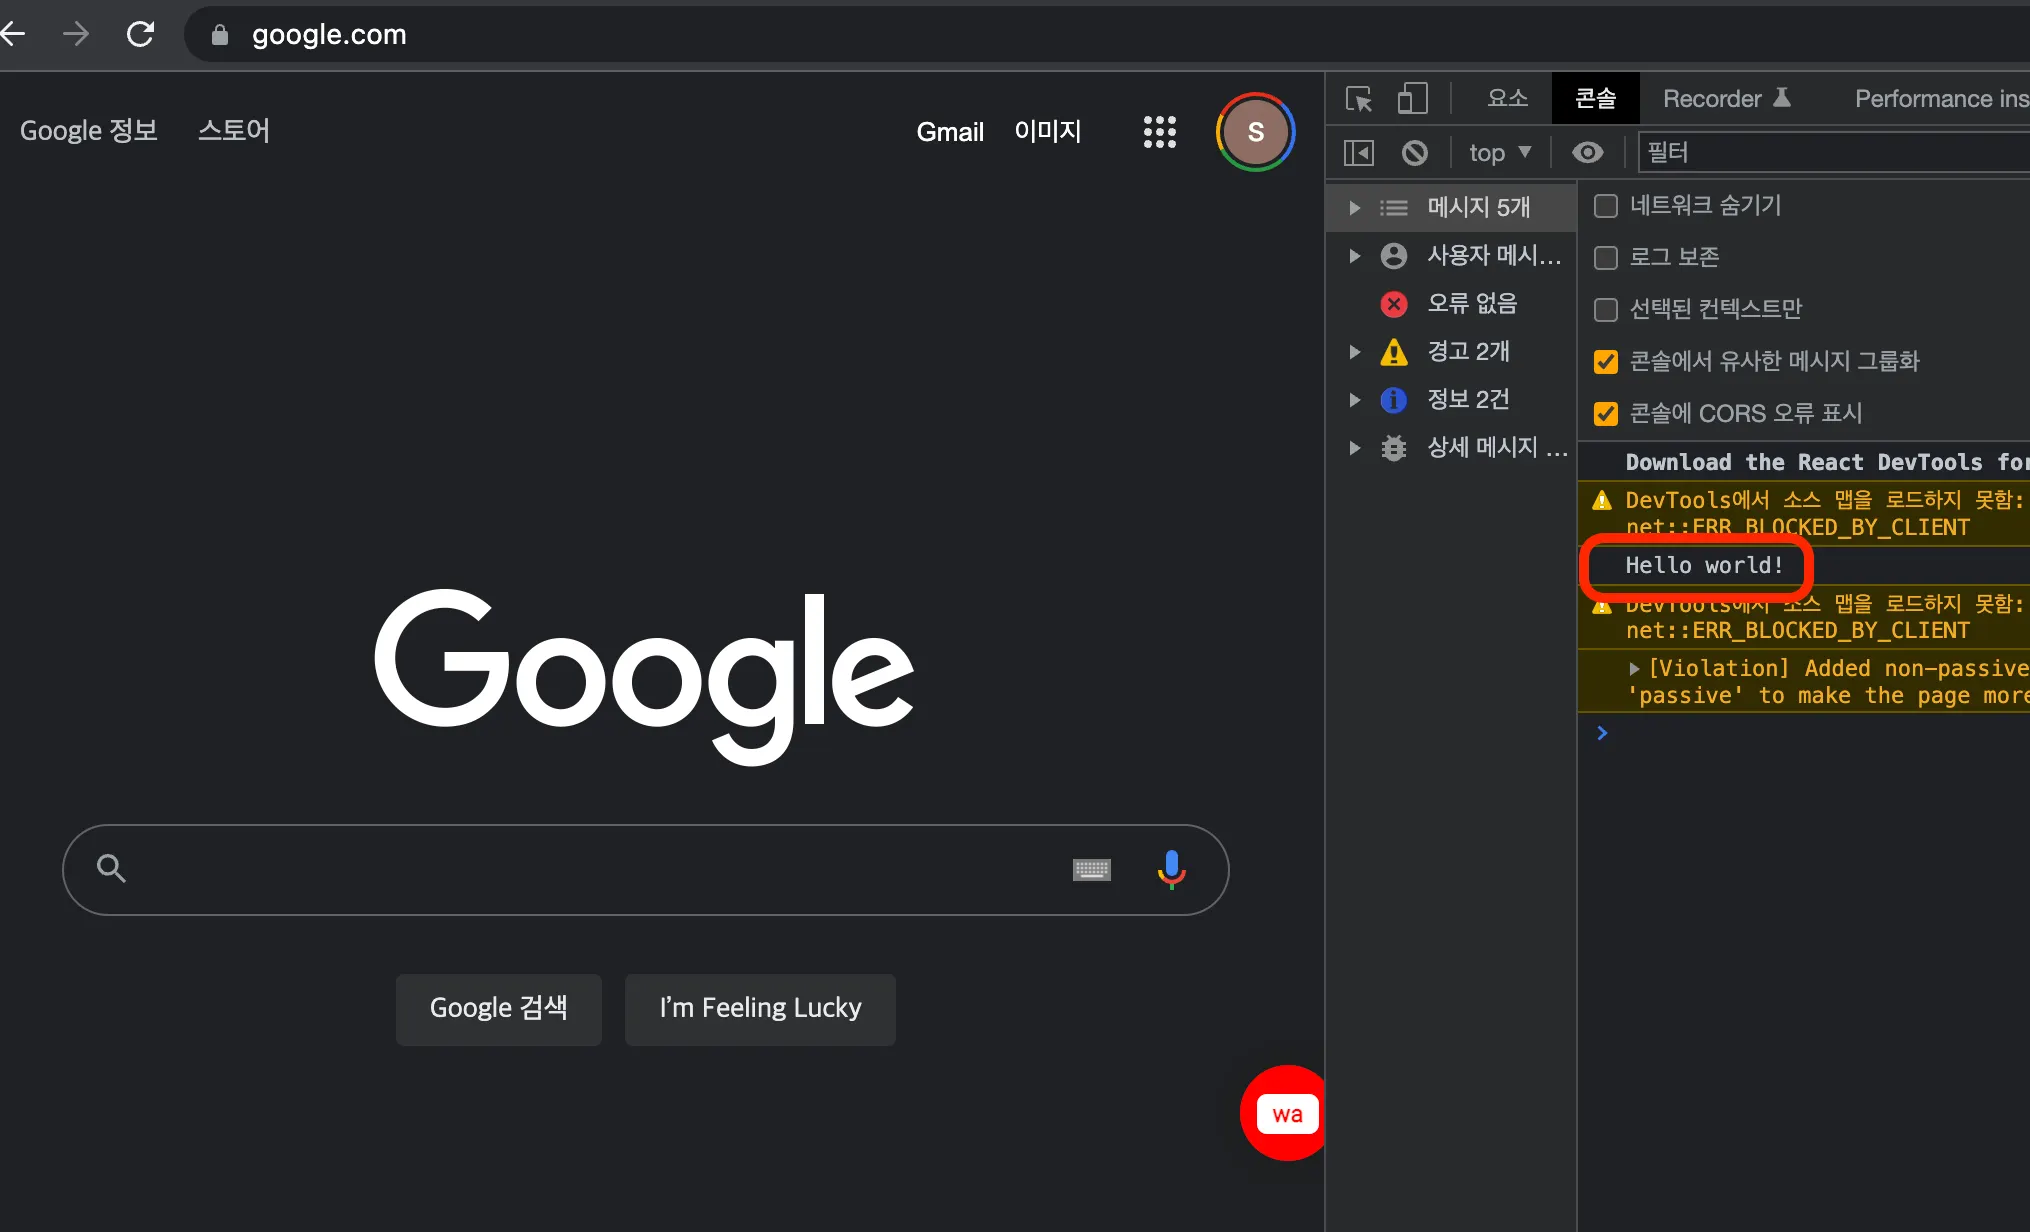
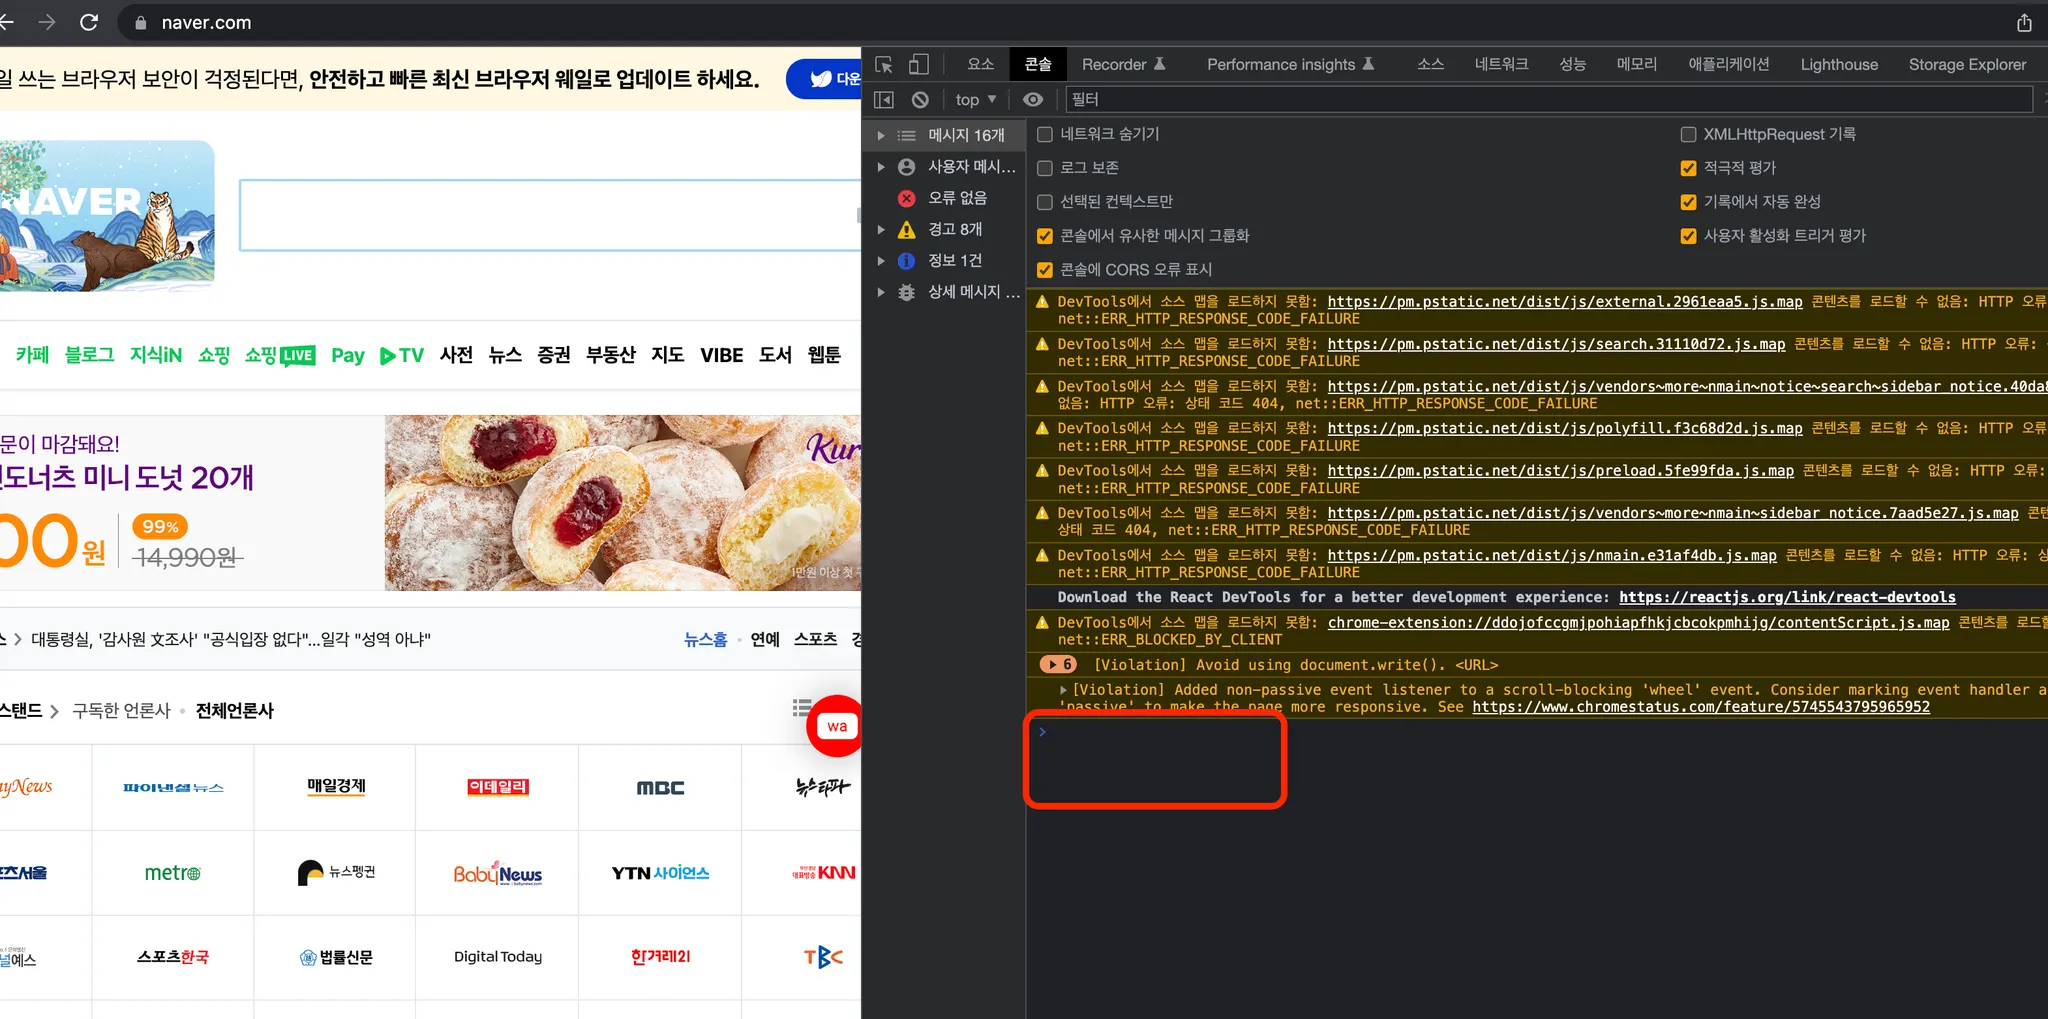
1) 백준 문제를 제출했을 때, 백엔드 서버로 결과를 전송하고 싶다면?
우선 백준 사이트에 대해서만 동작하는 content scripts를 만들기 위해 manifest.json에 아래와 같이 추가해 주었다. 그리고 해당 페이지에서 동작할 test.js를 작성해 보자!
// manifest.json
{
"content_scripts":[
{
"matches" : ["<all_urls>"],
"js" : ["contentScript.js"],
"exclude_matches" : [],
"run_at" : "document_idle"
},
{
"matches" : ["https://www.google.com/*"],
"js" : ["test.js"],
"exclude_matches" : [],
"run_at" : "document_idle"
}
]
}
JSON
복사
// test.js
console.log('Hello world!');
JavaScript
복사
아래 사진을 보면 각각의 script들이 기대한 대로 동작하는 것을 확인할 수 있다. google에서는 hello world!가 출력되고 naver에서는 아무것도 출력이 되지 않는 것을 확인할 수 있다.
그럼 이제 본격적으로 개발을 시작해보도록 하자. 우선 test.js에는 두가지 기능을 넣었다.
•
pathname이 /submit인 경우
id가 submit_button인 버튼을 찾아 chrome.storage에 제출하는 문제 번호를 저장
•
pathname이 /status인 경우
background로 메세지를 보내 원하는 동작을 수행
// test.js
if (window.location.pathname.includes('/submit')) {
const button = document.querySelector('#submit_button');
if (button) {
button.addEventListener('click', () => {
const problemNumber = window.location.href.split('/').pop();
chrome.storage.local.set({ submit: problemNumber });
});
}
}
if (window.location.pathname.includes('/status')) {
chrome.runtime.sendMessage({ message: 'submit' }, (response) => {
console.log(response);
});
}
JavaScript
복사
background.js의 do something이 위치한 곳에 백엔드 서버로 결과를 전송하는 비즈니스 로직을 추가할 수 있다. 만약 서버로부터 응답 받아서 response로 전송하는 것을 고려한다면, Promise, then() 등을 활용할 수 있다.
// background.js
chrome.runtime.onMessage.addListener((request, sender, sendResponse) => {
switch (request.message) {
...
case 'submit':
chrome.storage.local.get('submit', (data) => {
if (data.submit !== '') {
// do something!!
chrome.storage.local.set({ submit: '' });
sendResponse({ message: 'success' });
}
});
return true;
}
});
chrome.runtime.onInstalled.addListener(() => {
chrome.storage.local.set({ hideButton: false, submit: '' });
});
JavaScript
복사


1-1) 백준 문제를 맞았을 때, 다른 사용자에게 공유할 카드를 만들어 주자!
관련 내용은 추후 업데이트 예정입니다.
2) 매일 알고리즘 문제를 풀어야 youtube를 볼 수 있다면…?
1번과 같은 구조를 활용하면 이번 문제도 쉽게 해결할 수 있다. 아래와 같은 순서로 작업을 진행해 보자. 우선 백엔드 서버로에 오늘 문제를 풀었는지 받아오는 API가 없는 것을 고려하고 구현한다.
•
youtube url과 match되는 content script 작성
•
background로 메세지를 보냄
•
background에서는 백엔드 서버로부터 사용자가 오늘 문제를 풀었는지 결과를 받음
•
결과에 따라 백준으로 리다이렉팅할지 결정
// test2.ts
chrome.runtime.sendMessage({ message: 'checkTodaySolve' }, (response) => {
if (response.message === 'fail') {
window.location.href = 'https://www.acmicpc.net/';
}
});
TypeScript
복사
백엔드 측 API가 완성된다면, 단지 백준 홈페이지로 리다이렉팅 하는 것이 아니라 추천문제 페이지로 리다이렉팅 되는 것도 가능할 것 같아 보인다.
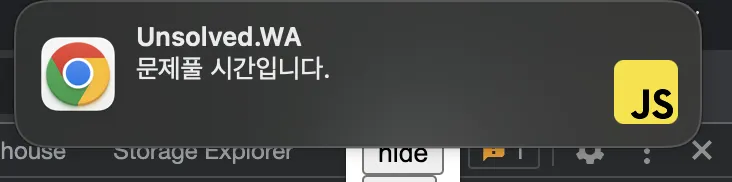
3) push message를 사용해서 사용자에게 알림을 보내려면?
갑자기 사용자에게 push알림을 보내고 싶어졌다. 예를 들면, 특정 시간에 알고리즘 문제를 풀어야 한다거나, 랭킹에 변동사항이 있다면 알림을 보내려고 한다. 이럴 때, chrome.notifications를 활용하면 사용자에게 push 알림을 보낼 수 있다!!
위에서 만든 구조를 비슷하게 응용해 보려고 한다. 테스트를 위한 코드를 작성할 것이기 때문에 popup에 버튼을 만들어서 버튼을 누를 때마다 push notification을 보내려고 한다.
// popup.js
function handleUNotificationButton() {
chrome.runtime.sendMessage({ message: 'sendNotification' });
}
JavaScript
복사
background에서 메세지를 받을 때 notification을 생성하도록 하자. basic type에서는 title, message, iconUrl을 포함해야 한다.
// background.js
switch (request.message) {
...
case 'sendNotification':
const option = {
type: 'basic',
title: 'Unsolved.WA',
message: '문제풀 시간입니다.',
iconUrl:
'https://noticon-static.tammolo.com/dgggcrkxq/image/upload/v1567008394/noticon/ohybolu4ensol1gzqas1.png',
};
chrome.notifications.create('helloworld', option);
}
JavaScript
복사
정상적으로 동작한다면 아래와 같이 나오는 것을 볼 수 있다. type을 변경하면 다양한 형태로 제작할 수 있다!

시스템 설정에서 chrome에 대한 알림을 허용해야 한다


