

1. 시나리오
•
Vmware와 gns를 통해 진행
•
pxe-ftp 192.168.3.21 (OS설치파일)
pxe-tftp 192.168.3.69 (부팅에 필요한 파일 전송)
pxe-client 192.168.3.0 /24 대역에서 150~160 아이피가 할당
•
pxe-http 192.168.4.80 (킥스타트 파일)
•
pxe-dhcp 192.168.1.67 (client에게 ip 부여)
클라이언트가 자동으로 192.168.3.0 대역 아이피를 할당받고 OS를 설치할 수 있도록 구성
2. 실습
2.1 pxe-ftp 구성
a. 방화벽 비활성화
systemctl disable --now firewalld
# config파일에서 selinux=disabled
vi /etc/selinux/config
# selinux=disabled를 위한 재부팅
init 6
Bash
복사
b. ftp 패키지 설치
yum -y install vsftpd
systemctl enable --now vsftpd
Bash
복사
c. OS설치파일 ftp에 올려두기
#centos7 이미지 파일 iso파일을 /media에 마운트
mount /dev/cdrom /media
#OS설치 파일을 ftp 기본 폴더에 전부 복사
cp -r /media/* /var/ftp/pub
#ftp 재시작
systemctl restart vsftpd
Bash
복사
d. 네트워크 재설정
•
패키지 설치를 위해 nat대역으로 설정해뒀던 것을 원래 아이피로 설정
2.2 pxe-tftp 구성
a. 방화벽 비활성화
systemctl disable --now firewalld
# config파일에서 selinux=disabled
vi /etc/selinux/config
# selinux=disabled를 위한 재부팅
init 6
Bash
복사
b. tftp 패키지 설치
yum -y install tftp-server
systemctl enable --now tftp
Bash
복사
c. syslinux 설치 및 tftp 폴더로 이동
•
*pxelinux.0파일은 .iso 파일내에 없으므로 설치
pxelinux.0 : pxe 부팅에 필요한 파일
yum -y install syslinux
cp /usr/share/syslinux/pxelinux.0 /var/lib/tftpboot/
Bash
복사
d. 커널과 임시 저장공간 tftp 폴더로 이동
•
*vmlinuz와 *initrd.img를 centos7.iso 파일에서 가져옴
vmlinuz : 압축된 리눅스 커널
initrd.img : 임시 저장공간으로 사용할 램디스크 파일(램을 마치 디스크처럼 사용)
mount /dev/cdrom /media
cp /media/images/pxeboot/vmlinuz /var/lib/tftpboot/
cp /media/images/pxeboot/initrd.img /var/lib/tftpboot/
Bash
복사
e. pxe 부팅 설정
cd /var/lib/tftpboot/pxelinux.cfg/
vi default
#default 파일
DEFAULT 본인이 원하는 이름
LABEL DEFAULT와 같은 이름
kernel vmlinuz
#repo는 initrd.img 가져올 곳 ks는 kickstart 관련 파일 가져올 곳
APPEND initrd=initrd.img repo=ftp://192.168.3.21/pub ks=http://192.168.4.80/본인이 정한 cfg 이름.cfg
Bash
복사
f. 재시작
systemctl restart tftp
Bash
복사
g. 네트워크 재설정
•
패키지 설치를 위해 nat대역으로 설정해뒀던 것을 원래 아이피로 설정
2.3 pxe-http 구성
a. 방화벽 비활성화
systemctl disable --now firewalld
# config파일에서 selinux=disabled
vi /etc/selinux/config
# selinux=disabled를 위한 재부팅
init 6
Bash
복사
b. 웹서버 패키지 설치
yum -y install httpd
sytemctl enable --now httpd
Bash
복사
c. kickstart 설정 파일 웹 서버 경로에 올려두기
vi /var/www/html/centos.cfg
#centos.cfg 파일내용(세부 설정 내용은 하기에 따라 다름
#gui환경에서 system-config-kickstart 패키지를 다운 받고 설정하는게 편할수도 있음
#platform=x86, AMD64, or Intel EM64T
#version=DEVEL
# Install OS instead of upgrade
install
# Keyboard layouts
keyboard 'us'
# Root password
rootpw --iscrypted $1$PlUn7Ika$C1EV.7Hw8WUHUCPzENz9t0
# System language
lang en_US
# System authorization information
auth --useshadow --passalgo=sha512
# Use graphical install
graphical
firstboot --disable
# SELinux configuration
selinux --disabled
# Firewall configuration
firewall --disabled
# Reboot after installation
reboot
# System timezone
timezone Africa/Abidjan
# Use network installation
####여기가 특히 많이 바뀔듯, os설치 파일 어디서 가져올지
url --url="ftp://192.168.3.21/pub"
####
# System bootloader configuration
bootloader --location=mbr
# Clear the Master Boot Record
zerombr
# Partition clearing information
clearpart --all --initlabel
# Disk partitioning information
part swap --fstype="swap" --size=2048
part / --fstype="xfs" --grow --size=1
##아래 패키지들은 gui환경에서만 받을 수 있음,minimal에서는 설정 적용 안됨
%packages
#@base
#@core
#@directory-client
#@fonts
#@gnome-desktop
#@input-methods
#@internet-browser
#@java-platform
#@multimedia
#@network-file-system-client
#@x11
%end
Bash
복사
d. 재시작
systemctl restart network
Bash
복사
e. 네트워크 재설정
•
패키지 설치를 위해 nat대역으로 설정해뒀던 것을 원래 아이피로 설정
2.4 pxe-dhcp 구성
a. 방화벽 비활성화
systemctl disable --now firewalld
# config파일에서 selinux=disabled
vi /etc/selinux/config
# selinux=disabled를 위한 재부팅
init 6
Bash
복사
b. dhcp 패키지 설치
yum -y install dhcp
systemctl enable --now dhcpd
Bash
복사
c. dhcp 설정
vi /etc/dhcp/dhcpd.conf
##dhcpd.conf 파일
#
# DHCP Server Configuration file.
# see /usr/share/doc/dhcp*/dhcpd.conf.example
# see dhcpd.conf(5) man page
#
subnet 192.168.3.0 netmask 255.255.255.0
{
option routers 192.168.3.200;
#GW
option subnet-mask 255.255.255.0;
#SM
range dynamic-bootp 192.168.3.150 192.168.3.160;
#ip를 받아올 수 없는 상황(bare-metal)에서도 ip를 부여받을 수 있도록.
option domain-name-servers 8.8.8.8;
#DNS
allow booting;
#부팅 허용.
next-server 192.168.3.69;
#PxE 서버의 주소
filename "pxelinux.0";
# next-server에 가서 받아올 파일.
}
###내가 속한 대역의 dhcp 설정을 만들어야 동작됨
subnet 192.168.1.0 netmask 255.255.255.0 {}
Bash
복사
d. 재시작
systemctl restart dhcpd
Bash
복사
e. 네트워크 재설정
•
패키지 설치를 위해 nat대역으로 설정해뒀던 것을 원래 아이피로 설정
2.5 gns 구성하기
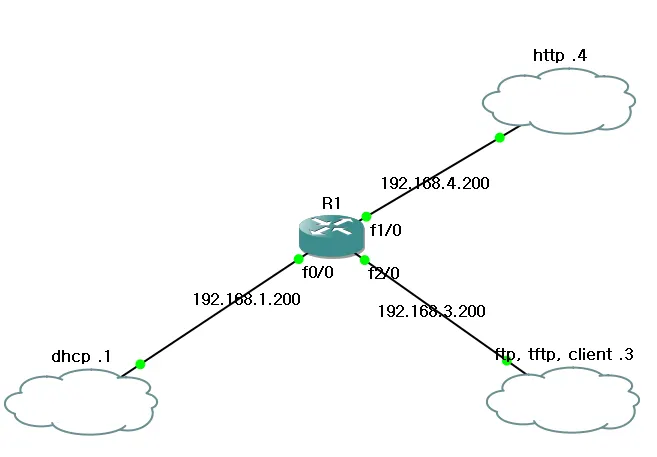
a. interface마다 아이피 설정
int f0/0
ip add 192.168.1.200 255.255.255.0
no sh
int f1/0
ip add 192.168.4.200 255.255.255.0
no sh
int f2/0
ip add 192.168.3.200 255.255.255.0
no sh
Bash
복사
b. ip helper-address 설정
•
interface f2/0에 helper-address 192.168.1.67 설정 해야함
int f2/0
ip helper-address 192.168.3.200 255.255.255.0
no sh
Bash
복사
3. 어려웠던점
•
dhcp설정을 하고 gns에서 라우터에 ip helper-address 설정을 해야함
브로드캐스트는 기본적으로 다른 라우터로 넘어가지 않음
따라서 ip helper-address 설정을 통해서 client가 브로드캐스트를 요청했을때 그 브로드캐스트가 어디로 가야할지를 알려줘야함
•
dhcpd.conf에서 자신의 ip대역을 설정을 안 해줘서 실행이 안됨
DHCP 데몬은 자기가 갖고 있는 pool 중에 적어도 거기에 속한 1개의 인터페이스를 갖고있어야 동작함
따라서 그 대역에 속한 가상의 인터페이스를 ‘임시로’ 한개 만들거나, 혹은 내가 속한 대역의 dhcp 설정을 아무거나 한개 만들어야 함
4. 성과
•
PxE 서버를 구성하여 새로운 더미 VMware의 가상머신들을 빠르게 생성할 수 있음
•
하나의 서버가 아닌 ftp, tftp, http, dhcp 기능을 하는 여러 서버들을 서로 통신하게 하여 하나의 pxe 서버 기능을 할 수 있도록 할 수 있음
•
오류 내용을 파악하여 어디가 문제 일지 역으로 추적할 수 있음
◦
dhcp 기능이 안됨
▪
같은 대역은 되는지 확인
▪
같은 대역은 되는데 다른 대역이 안 되는것으로 ip address 생각해냄
