

C++ 와 객체지향의 꽃이라고 불리우는 Template
-Template 와 다형성은 비슷하지만 다른 개념이라서 수정 하였습니다 (22.11.17)
Template 가 뭔지 알아봅시다.
Template ?
템플릿은 함수 테플릿과 클래스 템플릿이 있습니다.

함수 템플릿은 함수를 만들어내는 틀,
클래스 템플릿은 클래스를 만들어내는 틀입니다.
진짜 이게 다입니다.
예제를 보면서 알아봅시다.
1) 함수 템플릿 Function Template
#include <iostream>
void printFunc(int a, int b)
{
std::cout << a << ", " << b << std::endl;
}
int main(void)
{
printFunc(100, 999);
return 0;
}
//OUTPUT
100, 999
C++
복사
printFunction() 함수는 int 타입의 a와 b를 전달인자로 받아서 cout으로 출력해주는 함수입니다.
하지만 뭔가 부족합니다.
C++ 에서는 실수 말고도 다양한 다른 자료형들이 있기때문이죠.
다른 자료형도 위처럼 콤마로 나누어 출력하고 싶습니다.
어떻게 해야할까요?
템플릿이 없는 코드는 다음과 같습니다.
오버로딩으로 풀어내야 하죠.
#include <iostream>
void printFunc(int a, int b)
{
std::cout << a << ", " << b << std::endl;
}
//overloading 1
void printFunc(double a, double b)
{
std::cout << a << ", " << b << std::endl;
}
//overloading 2
void printFunc(std::string a, std::string b)
{
std::cout << a << ", " << b << std::endl;
}
int main(void)
{
printFunc(100, 999);
printFunc(3.14, 0.001592); //overloading 1
printFunc("ABCD", "EFGD"); //overloading 2
return 0;
}
//OUTPUT
100, 999
3.14, 0.001592
ABCD, EFGD
C++
복사
함수 오버로딩을 통해 매개변수 ( 전달인자 )의 타입이 각각 다르고, 함수이름은 같은 세가지 함수를 정의했습니다.
(int, int) , (double, double), (string, string)
함수 오버로딩은 이미 어떤 자료형을 통해 함수를 호출할지 명확하게 정의하고 있다는 전제로 만들어집니다.
BUT main 을 구현하는 사람과 printFunc 함수를 구현하는 사람이 나뉘었다고 가정해봅시다.
만일 다음과 같은 조건이 있다면 어떨까요
1.
printFunc 함수를 먼저 짜야합니다.
2.
main 문에서는 printFunc 함수에 어떤 전달인자가 구현되었는지 모른 상태로 그때그때 만들라는대로 전달인자에 넣어주어야 합니다.
즉, 어떤타입이든 들어갈 수 있도록 짜야합니다.
⇒ 그렇다면 C++에 존재하는 모든 타입에 대한 함수를 N개 정의 해야할까요??
이 문제는 함수 오버로딩으로 해결할 수 없습니다.
이런 문제를 해결하기 위해 Template 가 존재합니다.
템플릿 함수를 사용하여 Main 에서의 함수 호출 인자 타입을 보고,
템플릿 함수의 매개변수 타입을 결정하여 실제 함수인 템플릿 인스턴스 함수를 만듭니다.
문법 예시
함수 템플릿은 함수 앞에 template<typename T> 를 붙이면 됩니다.
template<typename T>
{리턴타입} 함수명(T 변수명, T 변수명);
C++
복사
#include <iostream>
template<typename T>
void printFunc(T a, T b)
{
std::cout << a << ", " << b << std::endl;
}
int main(void)
{
printFunc(100, 999);
printFunc(3.14, 0.001592);
printFunc("ABCD", "EFGD");
return 0;
}
//OUTPUT
100, 999
3.14, 0.001592
ABCD, EFGD
C++
복사
컴파일에서..
int main(void)
{
printFunc(100, 999);
printFunc(3.14, 0.001592);
printFunc("ABCD", "EFGD");
return 0;
}
C++
복사
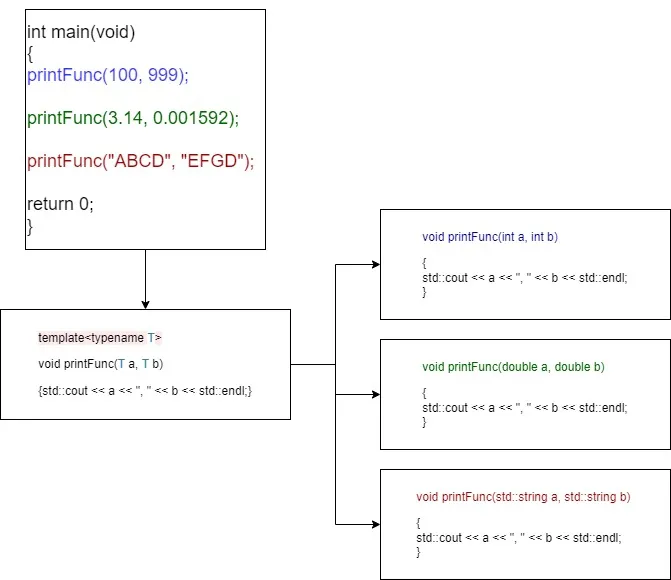
컴파일러의 동작은 다음과 같습니다.
1.
첫번째로 호출한 함수의 전달인자는 int, int 따라서 template의 T 가 int
2.
두번째로 호출한 함수의 전달인자는 double, double 따라서 template 의 T 는 double
3.
세번째로 호출한 함수의 전달인자는 std::string 따라서 template의 T는 std::string
컴파일러는 함수의 세가지 버전의 인스턴스를 만듭니다.
명시적 정의
다음과 같이 명시적으로 T에 들어갈 타입명을 지정할 수 있습니다.
int main(void)
{
printFunc(100, 999);
printFunc(3.14, 0.001592);
printFunc("ABCD", "EFGD");
return 0;
}
C++
복사
int main(void)
{
printFunc<int>(100, 999);
printFunc<double>(3.14, 0.001592);
printFunc<std::string>("ABCD", "EFGD");
return 0;
}
C++
복사
두가지 타입
#include <iostream>
template<typename T1, typename T2>
void printFunc(T1 a, T2 b)
{
std::cout << a << ", " << b << std::endl;
}
int main(void)
{
printFunc(100, 3.14);
printFunc(999, "ThisIsString");
return 0;
}
//OUTPUT
100, 3.14
999, ThisisString
C++
복사
T1, T2는 함수 템플릿의 매개변수입니다.
printFunc(100, 3.14); 에서는 T1에 int가, T2에는 double 이 들어가 생성됩니다.
printFunc(999, "ThisIsString"); 에서는 T1에 int가, T2에는 std::string 이 됩니다.
2) 클래스 템플릿 Class Template
클래스 템플릿은 클래스를 만들어내는 틀 입니다.
함수템플릿과 다르지 않습니다. 단지 함수에서 클래스로 바뀌었을 뿐
클래스 템플릿 예제
템플릿 없이 Array 클래스를 만들어본다면 다음과 같습니다.
#include <iostream>
class IntArray {
int *buf;
int size;
int capacity;
public:
explicit IntArray( int cap = 100 ) : buf( 0 ), size( 0 ), capacity( cap ) {
buf = new int[capacity];
}
~IntArray() {
delete[] buf;
}
void Add( int data ) {
buf[size++] = data;
}
int operator[]( int idx ) const {
return buf[idx];
}
int GetSize() const {
return size;
}
};
class DoubleArray {
double *buf;
int size;
int capacity;
public:
explicit DoubleArray( int cap = 100 )
: buf( 0 ), size( 0 ), capacity( cap ) {
buf = new double[capacity];
}
~DoubleArray() {
delete[] buf;
}
void Add( double data ) {
buf[size++] = data;
}
double operator[]( int idx ) const {
return buf[idx];
}
int GetSize() const {
return size;
}
};
class StringArray {
std::string *buf;
int size;
int capacity;
public:
explicit StringArray( int cap = 100 )
: buf( 0 ), size( 0 ), capacity( cap ) {
buf = new std::string[capacity];
}
~StringArray() {
delete[] buf;
}
void Add( std::string data ) {
buf[size++] = data;
}
std::string operator[]( int idx ) const {
return buf[idx];
}
int GetSize() const {
return size;
}
};
void main() {
IntArray iarr; // ���� Array ��ü
iarr.Add( 10 );
iarr.Add( 20 );
iarr.Add( 30 );
for ( int i = 0; i < iarr.GetSize(); ++i ) std::cout << iarr[i] << " ";
std::cout << std::endl;
DoubleArray darr;
darr.Add( 10.12 );
darr.Add( 20.12 );
darr.Add( 30.12 );
for ( int i = 0; i < darr.GetSize(); ++i ) std::cout << darr[i] << " ";
std::cout << std::endl;
StringArray sarr;
sarr.Add( "abc" );
sarr.Add( "ABC" );
sarr.Add( "Hello!" );
for ( int i = 0; i < sarr.GetSize(); ++i ) std::cout << sarr[i] << " ";
std::cout << std::endl;
}
Java
복사
IntArray, DoubleArray, StringArray 세가지의 클래스의 기능과 책임은 타입만 다를 뿐 다른것은 모두 같습니다.
이 예시는 원소 타입을 자유롭게 결정할 수 없습니다.
유연한 클래스를 만들기 위해 클래스 템플릿을 사용할 수 있습니다.
문법
template<typename T> class {Array}
C++
복사
Array Template 예시
#include <iostream>
#include <string>
template <typename T>
class Array {
private:
T *buf;
int size;
int capacity;
public:
explicit Array( int cap = 100 ) : buf( 0 ), size( 0 ), capacity( cap ) {
buf = new T[capacity];
}
~Array() {
delete[] buf;
}
void add( T data ) {
buf[size++] = data;
}
T operator[]( int idx ) const {
return buf[idx];
}
int getSize() const {
return size;
}
};
template <typename T>
void printElements( T &arr ) {
for ( int i = 0; i < arr.getSize(); i++ ) {
std::cout << arr[i] << std::endl;
}
}
int main( void ) {
Array<int> intArr;
intArr.add( 10 );
intArr.add( 20 );
intArr.add( 30 );
printElements( intArr );
std::cout << std::endl;
Array<double> dblArr;
dblArr.add( 3.14 );
dblArr.add( 1.59 );
dblArr.add( 2.498 );
printElements( dblArr );
std::cout << std::endl;
Array<std::string> strArr;
strArr.add( "abc" );
strArr.add( "EDF" );
strArr.add( "Hello World!" );
printElements( strArr );
}
C++
복사
class Array를 T 타입으로 정의하여, main 에서 생성할때에
int, double, string 으로 각각 필요한 타입에 따라서 생성되는 것을 확인할 수 있습니다.

템플릿은 클래스의 메타 코드일 뿐이며,
컴파일러가 클래스 템플릿을 이용하여 실제 클래스(타입이 정의된 코드)를 생성합니다.
3) Template 디폴트 매개변수
c++ 에서는 default 매개변수 지정을 해주는것을 문법으로 지원합니다.
Template 에서도 default 매개변수 지정과 같이 템플릿에 아무 타입을 명시하지 않았을경우, 기본타입을 지정해 줄 수 있습니다.
문법
template <typename T = {default 타입명}, {매개변수 값}>
C++
복사
Array 예시
#include <iostream>
#include <string>
template <typename T = int, int capT = 100>
class Array {
private:
T *buf;
int size;
int capacity;
public:
explicit Array( int cap = capT ) : buf( 0 ), size( 0 ), capacity( cap ) {
buf = new T[capacity];
}
... 생략
//초기화 된 capacity 확인용
int getCapacity() const {
return capacity;
}
};
template <typename T>
void printElements( T &arr ) {
for ( int i = 0; i < arr.getSize(); i++ ) {
std::cout << arr[i] << std::endl;
}
}
int main( void ) {
Array<> intArr;
intArr.add( 10 );
intArr.add( 20 );
intArr.add( 30 );
std::cout << "capacity = " << intArr.getCapacity() << std::endl;
printElements( intArr );
std::cout << std::endl;
Array<double> dblArr;
dblArr.add( 3.14 );
dblArr.add( 1.59 );
dblArr.add( 2.498 );
std::cout << "capacity = " << dblArr.getCapacity() << std::endl;
printElements( dblArr );
std::cout << std::endl;
Array<std::string, 10> strArr;
strArr.add( "abc" );
strArr.add( "EDF" );
strArr.add( "Hello World!" );
std::cout << "capacity = " << strArr.getCapacity() << std::endl;
printElements( strArr );
}
//10
//20
//30
//capacity = 100
//3.14
//1.59
//2.498
//capacity = 100
//abc
//EDF
//Hello World!
//capacity = 10
C++
복사
template <typename T = int, int capT = 100>
class Array { ... }
T를 지정해주지 않았을경우, 기본값으로는 int 를 대입하게 되며,
int capT 라는 변수를 선언하여 초기값을 100으로 설정해주었습니다.
Array<> intArr;
타입값을 지정해주지 않은 intArr 은 default 값인 int로 초기화 되며,
capacity 또한 default로 지정해준 100인 것을 확인할 수 있습니다.
Array<double> dblArr;
타입값은 double로 지정해주었지만, capacity는 default 값인 100으로 초기화됩니다.
Array<std::string, 10> strArr;
타입값은 string, capT 값도 10 으로 지정해주어, capacity 가 10으로 초기화되었습니다.
Array Default Template 전체 코드
3) Template 특수화
대부분의 경우 템플릿으로 제네릭 하게 사용하는 것이 해결이 되지만, 특수한 경우가 있을 수 있습니다.
예시로 확인해보겠습니다.
#include <iostream>
#include <string>
template <typename T>
class ObjectInfo {
T data;
public:
ObjectInfo( const T& d ) : data( d ) {
}
void printFunc( void ) {
std::cout << "TYPE : " << typeid( data ).name() << std::endl;
std::cout << "SIZE : " << sizeof( data ) << std::endl;
std::cout << "VALUE : " << data << std::endl;
std::cout << std::endl;
}
};
int main( void ) {
ObjectInfo<int> d1( 10 );
d1.printFunc();
ObjectInfo<double> d2( 3.14 );
d2.printFunc();
ObjectInfo<std::string> d3( "HI!" );
d3.printFunc();
}
/*
TYPE : i
SIZE : 4
VALUE : 10
TYPE : d
SIZE : 8
VALUE : 3.14
TYPE : NSt3__112basic_stringIcNS_11char_traitsIcEENS_9allocatorIcEEEE
SIZE : 24
VALUE : HI!
*/
C++
복사
ObjectInfo 클래스는 Type 을 Template 로 받아서, 해당 타입의 typeid, 크기, 실제 데이터를 출력합니다.
string 을 data , TYPE로 가지는 d3 객체를 확인해보면, typeid 함수를 통한 TYPE 값과 SIZE 값이 실제 크기와 다른것을 확인할 수 있습니다.
int 와 double 은 각각 i, d 로 출력되었고, string 의 길이는 H I ! 3이어야 할 것 같지만 24로 표현됩니다.
이는 string 도 템플릿 클래스로 typedef 되어있기 때문에 그렇습니다.
따라서 이 일관성 없는 클래스를 일관성있게 만들어 주기 위해서 string 을 위한 클래스를 별도로 정의해줍니다.
template <>
class ObjectInfo<std::string> {
std::string data;
public:
ObjectInfo( const std::string& d ) : data( d ) {
}
void printFunc( void ) {
std::cout << "TYPE : " << "string" << std::endl;
std::cout << "SIZE : " << data.size() << std::endl;
std::cout << "VALUE : " << data << std::endl;
std::cout << std::endl;
}
};
/*
TYPE : i
SIZE : 4
VALUE : 10
TYPE : d
SIZE : 8
VALUE : 3.14
TYPE : string
SIZE : 3
VALUE : HI!
*/
C++
복사
전체 코드
기존 코드에 위 코드를 추가해줍니다.
template<> 로 선언해주고, T 였던부분을 특수화 할 타입으로 변경해주면 됩니다.
이와같이 특수한 경우에 따로 정의해주는 것을 템플릿 특수화 라고 합니다.
이상 함수, 클래스 템플릿과 템플릿 특수화에 대해서 알아보았습니다.
