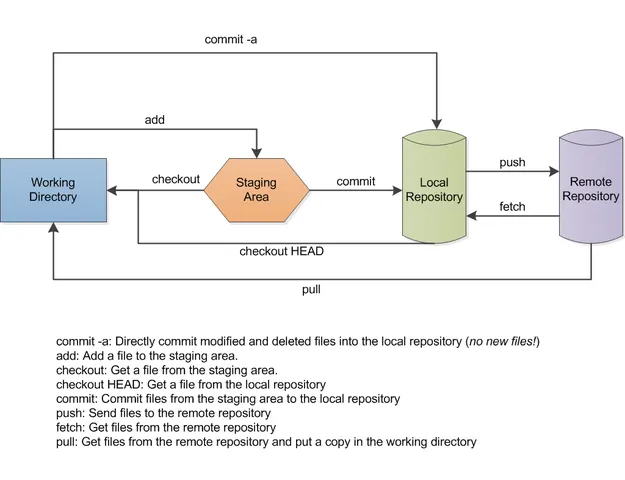
목적
•
관성적으로 git clone repository를 가져오는것에서 탈피하여, 깃허브의 동작을 조금 더 잘 이해하기 위함.
•
결국 아래 그림을 잘 이해하고자하는 목적을 가짐
실습
1.
mkdir temp; cd temp
2.
git init
3.
git remote add origin2 git@github.com:exgs/github_test.git
•
“origin2”은 remote의 이름이다. 내가 마음대로 변경할 수 있다.
•
`git log --all` 으로 확인해보기
•
`git remote show & `git remote show origin2` 로 확인해보기
4.
git fetch origin2 yunslee & git merge origin2/yunslee
현재 local branch가 remote branch의 commit 으로 이동함,
즉 Working Directory에서 remote repository에 있는 파일과 폴더로 작업할 수 있음
두 명령어를 합친 것이 git pull origin2 main 이다. git pull == git fetch + git merge
Advanced more
1.
git remote add origin3 git@github.com:exgs/github_test.git -t {branch_name}
특정 branch만 remote에서 가져올 수 있음
2.
git clone —depth 을 통해 Shallow clone을 할 수 있다.
추가 22.6.16
•
git remote add origin2 git@github.com:exgs/github_test.git 로 불러 올 수 있는 경우는 ssh key가 github에 등록되어있는 경우이다.
•
ssh key가 등록되어있지 않은 경우는 HTTPS로 불러와야하는데 이때는 토큰을 써야한다.
현재는 git remote add origin2 https://{token}@github.com/exgs/github_test.git 로 remote 리파짓토리를 붙일 수 있다.
•
github의 정책이 변경되기전에(21-8-13) password Authentication 이 가능할 시점할 때에는 git remote add origin2 https://{user}:{password}@github.com/exgs/github_test.git 로 불러 올 수 있었겠다.
감사합니다.
1.
커맨드를 실행하면서 git의 간단한 조작에 대해서 이해가 넓혀졌으면 좋겠습니다.
2.
틀린 부분은 comment 부탁드립니다.


