

위 게시물과 내용이 이어집니다.
앱에 로그인을 할 때마다 touch id를 입력해야 한다는 점이다.
로그인에 성공했을 때 받아오는 정보인 identity_token, authorization_code 은 유효 시간이 5분, 10분으로 짧아서 사용하기 어렵다.
해결 방법을 웹 페이지 로그인하는 방식에서 찾을 수 있었다.
과정
Key발급
1.
Apple Development Account에서 Certificates, Identifiers & Profiles 메뉴 선택
2.
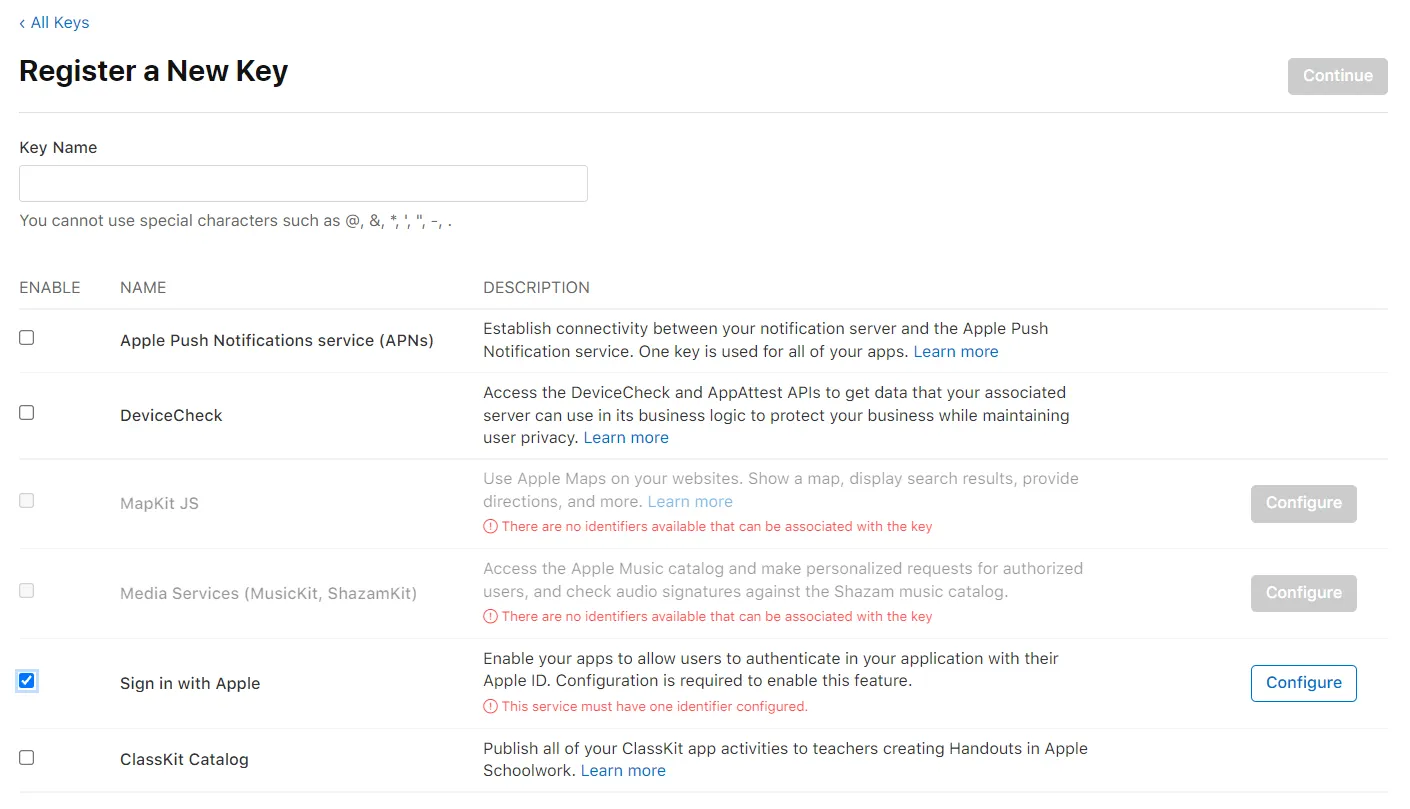
왼쪽 메뉴 목록 중 Keys 선택 후 파란색 ‘+’버튼으로 새로 생성
3.
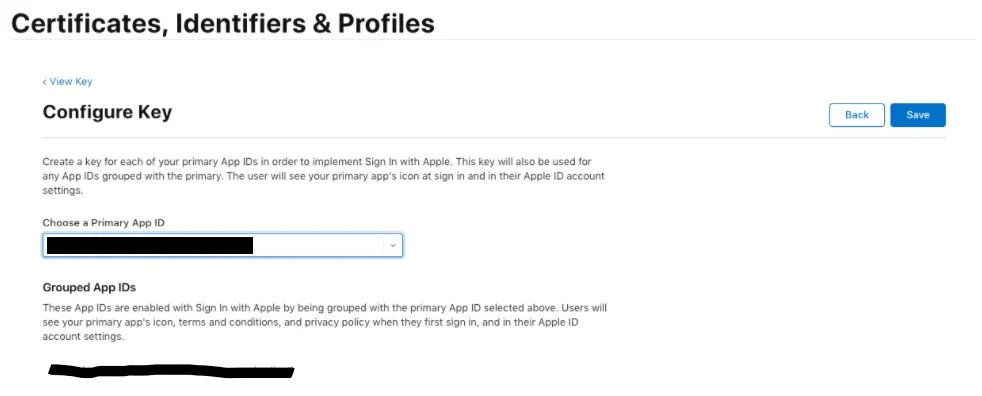
key 이름과 하단에 Sign in with Apple 체크 후 Continue 선택
4.
적용할 App ID 선택 > Save
5.
Download 버튼을 눌러서 key 파일 저장
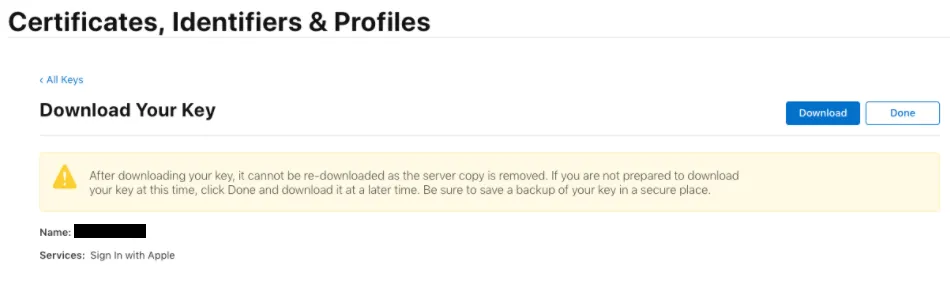
Key 파일은 이후에 다시 다운로드 받을 수 없기 때문에 꼭 잃어버리지 않도록 주의해야한다.
잃어버린 경우 재발급하는 방법밖에 없다.
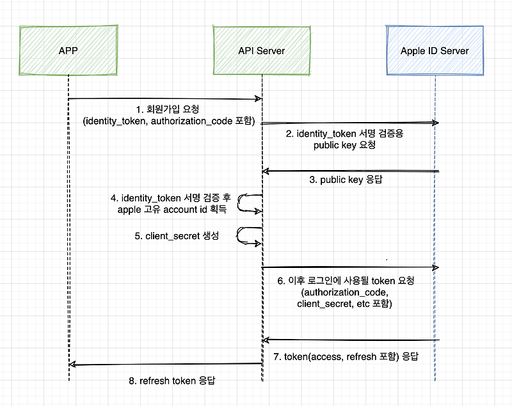
처음 로그인 하는 과정
https://appleid.apple.com/auth/token 에 정보를 POST형식으로 넘겨준다.
•
client_id(필수) : appe bundle id
•
code : app에서 넘겨 받은 Authorizaiton Code
•
grant_type(필수): “authorization_code” or “refresh_token”
•
refresh_token : app에서 넘겨 받은 Refresh Token
•
redirect_uri: 인증 후 이동 될 uri (웹에서 로그인 처리할 때 사용)
•
client_secret(필수): 개발사 정보가 담긴 jwt 형식 토큰
client_secret 생성
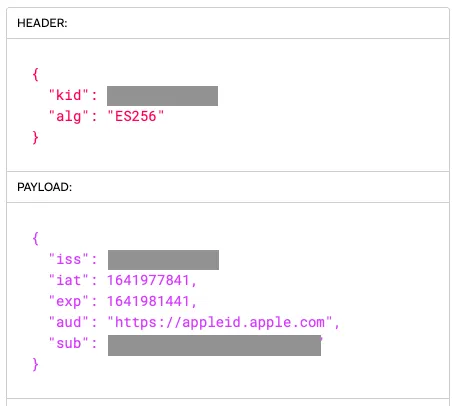
client_secret은 JWT형식으로 아래 내용을 담고 있다.
{
"alg": "ES256",
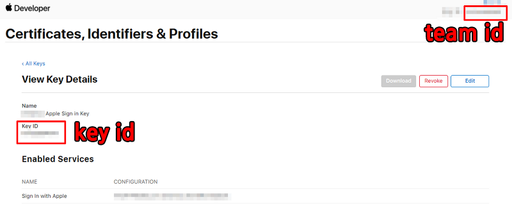
"kid": "[apple 개발자 계정으로 발급받은 key id]" //Apple Developer>Keys 에서 확인 가능
}
{
"iss": "[apple 개발자 계정 팀 id]" // Apple Developer 우측 상단에서 확인 가능
"iat": 1437179036, // client_secret이 생성된시간 -> 현재시간
"exp": 1493298100, // 유효시간 초단위 최대 6개월
"aud": "https://appleid.apple.com",
"sub": "[bundle id]"
}
C#
복사
[]은 입력이 필요한 곳
1.
vi client_secret.rb
require 'jwt'
key_file = '[apple 개발자 계정으로 발급받은 key file]' // AppleDevelpor>Keys 에서 key 생성할 때 받았던 .p8파일 이름
team_id = '[apple 개발자 계정 팀 id]'
client_id = '[bundle id]'
key_id = '[apple 개발자 계정으로 발급받은 key id]'
ecdsa_key = OpenSSL::PKey::EC.new IO.read key_file
headers = {
'kid' => key_id
}
claims = {
'iss' => team_id,
'iat' => Time.now.to_i, // 만료 시간은 초 단위. 최대 6개월
'exp' => Time.now.to_i + 3600, // 1분: 60초 1시간: 3600초 1일:86,400초
'aud' => 'https://appleid.apple.com',
'sub' => client_id,
}
token = JWT.encode claims, ecdsa_key, 'ES256', headers
puts token
Ruby
복사
[]안의 내용은 입력이 필요한 곳
2.
Apple Development>Keys에서 받았던 .p8 파일을 같은 폴더로 옮기기
3.
client_secert.rb 내용 중 key_file에 .p8파일 이름으로 설정
4.
ruby client_secret.rb
Mac에는 ruby가 기본적으로 있으니 ruby 명령어가 안된다면 sudo를 붙이기
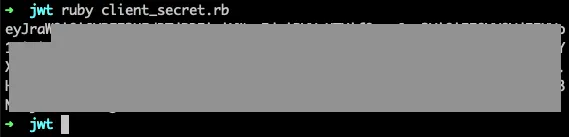
실행 결과로 나오는 문자열이 client_secert이고,
https://jwt.io/ 에서 값이 제대로 들어가 있는지 확인해볼 수 있다.
token 요청
이전 게시물에서 작성했던 SignWithApple() 함수에서 identity_token이 아닌 authorization_code를 사용한다.
using UnityEngine.Networking;
public void SigninWithApple()
{
var loginArgs = new AppleAuthLoginArgs(AppleAuth.Enums.LoginOptions.IncludeEmail | AppleAuth.Enums.LoginOptions.IncludeFullName);
appleAuthManager.LoginWithAppleId(
loginArgs,
credential =>
{
var appleIdCredential = credential as IAppleIDCredential;
if (appleIdCredential != null)
{
string authorizationCode = Encoding.UTF8.GetString(appleIdCredential.AuthorizationCode);
StartCoroutine(getTokne(authorizationCode)));
}
},
error =>
{
Debug.log("Apple Signin Error");
});
}
IEnumerator getToken(string code)
{
//Post 요청에 담을 정보 설정
WWWForm form = new WWWForm();
form.AddField("client_id", "[bundle id]");
form.AddField("code", code);
form.AddField("grant_type", "authorization_code");
form.AddField("client_secret", "[client_secret]");
UnityWebRequest www = UnityWebRequest.Post("https://appleid.apple.com/auth/token", form);
//요청에 대한 응답이 올때까지 대기
yield return www.SendWebRequest();
//응답 결과
if (www.error == null)
{
Debug.Log(www.downloadHandler.text);
// 로그인 처리
}
else
Debug.Log(www.error.ToString());
}
C#
복사
[]안의 내용은 입력이 필요한 곳
Debug.Log(www.downloadHandler.text); 으로 응답 결과를 출력해보면
"access_token": "aaaa",
"token_type": "Bearer",
"expires_in": 3600, // access_token의 유효시간
"refresh_token": "bbbb",
"id_token": "cccc" // jwt 형식. identity_token처럼 로그인 할 때 사용.
C#
복사
위 항목들이 json형식으로 출력된다.
로그인 할 때는 identity_token 대신 id_token 을 넘겨주면 된다.
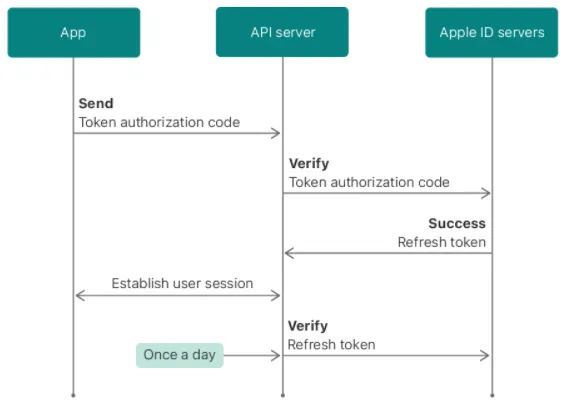
자동 로그인에 refresh_token이 사용되기 때문에 따로 저장할 필요가 있다.
token 검증
Apple Developer 공식문서에서는 토큰이 변조되지 않았는지, 유효시간이 만료되지 않았는지 등을 확인하라고 되어있다.
검증하는 과정은 아래 블로그의 Signature 검증하기 (Identity Token 검증하기) 단락에 소개되어 있다


다시 로그인 하는 과정
재발급 요청에 필요한 요소
•
client_id
•
refresh_token
•
grant_type: “refresh_token”
•
client_secrete
refresh_token 검증
처음 로그인 할 때와 같이 refresh_token도 검증해줘야 한다.
재발급 요청
처음 로그인 할 때와 달라지는 부분은
인증에 사용되는 토큰이 authorization_code → refresh_token으로 바뀌고
apple-signin-unity Plugin을 실행하지 않는다.
using UnityEngine.Networking;
public void QuickLogin(string refreshToken)
{
StartCoroutine(getToken(refreshtoken)));
}
IEnumerator getToken(string code)
{
//Post 요청에 담을 정보 설정
WWWForm form = new WWWForm();
form.AddField("client_id", "[bundle id]");
form.AddField("refresh_token", code); //("code", code);
form.AddField("grant_type", "refresh_token"); //("grant_type", "authorization_code");
form.AddField("client_secret", "[client_secret]");
UnityWebRequest www = UnityWebRequest.Post("https://appleid.apple.com/auth/token", form);
//요청에 대한 응답이 올때까지 대기
yield return www.SendWebRequest();
//응답 결과
if (www.error == null)
{
Debug.Log(www.downloadHandler.text);
// 로그인 처리
}
else
Debug.Log(www.error.ToString());
}
C#
복사
[]안의 내용은 입력이 필요한 곳
주의사항
client_secret
작동 여부를 보기 위해 코드에 직접 입력한 방식을 사용했지만 실제로 저렇게 하드코딩으로 넣거나 로컬에 저장하는 방식은 권장하지 않는다.
앱스토어의 앱 id, 팀 id가 그대로 들어있고, 인코딩되어 있지만 JWT형식임을 알면 디코딩하기도 쉽기 때문이다.
그래서 따로 서버에서 client_secret을 받아오는 방식으로 수정하거나 서버서 애플에 post 요청까지 할 수 있게 만드는 게 좋다.
client_secret.rb에 입력한 유효 시간이 지나면 더 이상 로그인이 되지 않기 때문에 주기적으로 발급받고 교체 해주는게 필수!
참고한 사이트